Using the Advanced Plate Command

This task explains how to create a plate (such as a transversal bulkhead) with specific contours. Using the Advanced Plate command, you can create a plate with a concave limit without having to use the Sketcher
When you create a plate with the Advanced Plate command, you must select limits in a precise order. Two consecutive limits must intersect each other and respect the orientation.

1. To create a plate with the Advanced Plate command:

Click the Advanced Plate button and the 
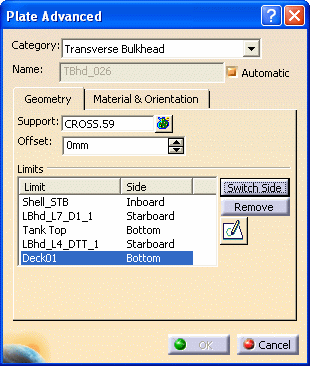
Advanced Plate dialog box displays.


2.

Select a plate type from the Category drop down list. This task uses a transversal bulkhead as an example.

(You can select More to display the Class Browser, and select plates not displayed in the drop down list.)

  3. Select a support in the 3-D session. (For this example, select a cross as the location for the bulkhead.)

Your selection displays in the Support field.

  4. In the 3-D session, select the limits for the desired contour.

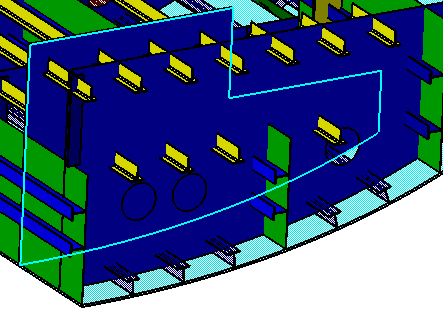
These limits are functional limits. Your selection trims the plate and displays under the Limit column.

You can begin selecting limits on any side, but you must proceed in the order of the contours.

Remember, consecutive limits must intersect each other.

  5.

As you select the limits, a dashed line displays, representing the last limit selected.

The line assists you with the orientation. If you see that you have chosen to limit the wrong side, click the Switch Side button, or select the same limit again. Or you can delete the limit by clicking the Remove button.

You need to limit every side until you close all the contours of the plate, with the last limit intersecting the first limit.

  6. You can only use Remove or Switch Side for the last limit selected. If you need to remove or switch sides for a limit that is not the last selected, you first must close all the contours of the plate.

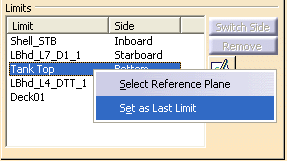
Now select the limit, right click and select Set as Last Limit. You now can click Remove or Switch Side for this limit.

Select another limit to create the plate, closing all the contours of the plate.

  7. Under Offset, you can define the offset value of each plate limit. A positive value adds material. A negative value removes material. Additionally, limit tags display in your 3-D session to assist with plate limit management.
  8. Click OK when you have selected all the limits. The OK button is available only after you have selected the appropriate limits, and closed the contours (the last limit intersecting the first limit).

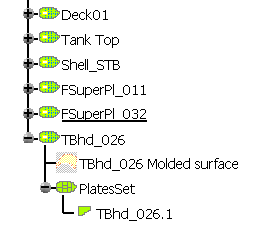
The plate you created (a transversal bulkhead) displays in the specifications tree.

You can select the plate in your 3-D session and see the concave surfaces.