 |
This task explains how you should
create a product. ENOVIA and CATIA should be running and connected. You
should be in the ENOVIA home page
 . . |

|
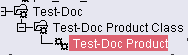
You should familiarize yourself with the
directory structure in ENOVIA. At the top level you will have a directory
called product class root - this usually encompasses all the
activity in your company. Under this you may have several product class
directories. Under the product class will be the product
directories. Product displays in this application, the other two
are only displayed in ENOVIA. Users will mostly interact with the product.
It is created at individual project level - in a shipyard it will be
created for each ship that is designed - and diagrams documents are created
under the product. The product class directories may not be created in
smaller projects, but the product class root and the product directories
should always exist. |
 |
1. |
Information about creating all
three levels is provided in ENOVIA documentation. Briefly,
to create a product you should be in the
Product Class View.
Right click on the product class, select New and then Product in the
menus that display. Enter a name for the product in the product ID field.
Add to the Name and Description fields for informational purposes if you
want. The newly created directory displays in the Product Class View.
|
|
2. |
Click the Save button to save your
changes. |
|
|
A Characteristics window displays
after you create a directory. You do not need to enter any information in
it. Read the ENOVIA user guide to learn more about this window. |