 |
This task explains how you should
organize the work packages that you create. |
 |
This type of organization is usually done by
an administrator. See ENOVIA documentation for more information on
components. |
 |
1. |
Work packages must always be
created at the same level in the specifications tree, under the Product.
However, users can create "components" using the Component Editor, and
group work packages under these components. |
|
|
2. |
To create a component, expand your
tree in the Product Editor so that the Product is visible. Right click on
the Product, select Send To and then Component Editor. The Component Editor
opens with your Product visible. |
|
3. |
Right click on the Product and
select Insert Child. In the Product pane that displays, make sure Generic
Component is selected in the Type field. Enter a name for the component in
the Product Component ID field, in this example PipingComponent. Make
entries in the Name and Description fields (for informational purposes) if
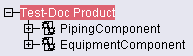
you want to, and click Add or OK. The component you created displays under
the Product. 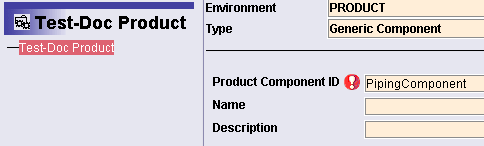
Make entries in the Name and Description fields (for informational
purposes) if you want to, and click Add or OK. The component you created
displays under the Product.
|
|
4. |
Save your changes. |
|
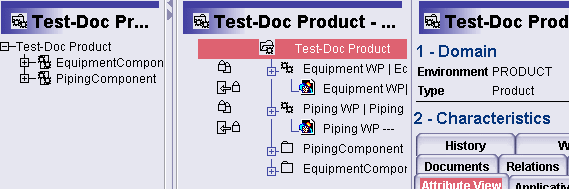
5. |
When you open the Product Editor
again you will see three columns, with the first column showing the product
and the newly created components, the second column showing the work
packages and components, and the last column showing characteristics - if
you select an object. If you do not see work packages in the second column
then right-click on the product and select Open Assembly in Instance View.
 |
|
6. |
To group one or more work packages
under the component, right click on a work package and select Copy.
 |
|
7. |
Next, right click on a component,
and select Special Paste - Link. The work package will be grouped under
that component. 
|
|
8. |
Save your changes. |