Changing the Size or Specification of a Part

This task shows you how to resize a part, or group of parts, or change the specification.


1.

With your document open click the Resize/Respec Part button . The Resize/Respec window opens. (The Reset/Resize/Respec buttons become available after you make a selection.)

2. To change the size or specification of parts in a network, click the Select elements in range button.  The Analyze Networks dialog box displays. Click the Path tab and set the From Object and To Object.

When Current Path and Number of objects in current path accurately reflect the range you want to select, click Close. The Resize/Respec dialog box opens. Click Resize to open the Resize Parts dialog box, explained in the next step.

3.

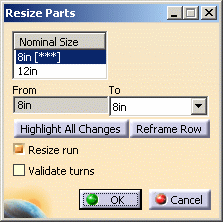
Nominal Size: This field displays the size of parts in your selection. If there is more than one size in your selection then more than one size displays, as in the image above. If one part has more than one size (a reducer) and you have checked the option List Multiple Sized Parts in the Resize/Respec dialog box, then the display will be as shown below, to allow for more flexibility in selection.

The asterisks after the value will be replaced by a value once you make your selection in the To field. For a rectangular object you will get height and width fields. See HVAC Design documentation.

You can highlight your selection change, or reframe it, using the buttons. If the Resize Run  and Validate Turns (checks for turn radius errors) options are grayed out, it is because these operations are not relevant - there is no run selected. Move your pointer over a part to see values for various properties.

Make your changes and click OK, to open the Define Part Options dialog box.

  4. The Define Part Options dialog box allows you to select a part when you have more than one selectable part.

  • The first line shows an error - you will not be able to resize the nozzle.
  • The asterisk in the first column means you have more than one selectable option for this part.
  • The Options field appears when you select a part. Click on the down arrow to display your options, shown above.

Make your selection and click OK. The selected parts will be resized.

  5. To change the specification, click the Respec  button after making your selection (Step 2). The Respec Parts dialog box opens, allowing you to change/add the specification. The From and To fields display after you select a specification. In HVAC Design the column headings are different. See HVAC Design documentation.


  6. To change the size or spec of all members of a line ID in the active document click the Select Line  button , and select the Line ID in the Selection List that displays. Click OK and the Resize/Respec dialog box will open. Make changes as necessary.
7. To change the size or specification of members of a Spool, click the Select Spool  button ; select the spool in the Selection List that displays, and click OK. With the Resize/Respec dialog box open, proceed as above, making the desired changes.
8. To change the size or spec of a single part select it in the document or from the specification tree and click the Resize/Respec button. The Resize/Respec dialog box will open. Select the Resize or Respec button and make your changes.