2.

![]()
|
|
This task shows how to copy V4 *GPR, *STR and *PIP geometry to V5. | |
|
|
1. | Move your V4 model (by ftp or any other means) to the same platform as V5, in this case Windows. |
|
2. |
In V5, open the V4 model you just moved. Your model will have tabs for *MASTER and *DRAFT and perhaps some detail workspaces. | |
| 3. | With this model displayed, open a new part document and enter a name for the V5 part. For the sake of convenience, it is recommended that you use the name the part had in V4. The part will display in the specifications tree. Expand the specification tree until you see the part body entry (e.g., PartBody, Open body, Layout, etc.). Double click on it to make it active. | |
| 4. | Click Window - Tile, horizontal or vertical (as you prefer), to display both documents. | |
| 5. | To copy geometry from a detail workspace, select the tab for that workspace. You can select the geometry individually, or with a trap box. Click Edit - Copy. | |
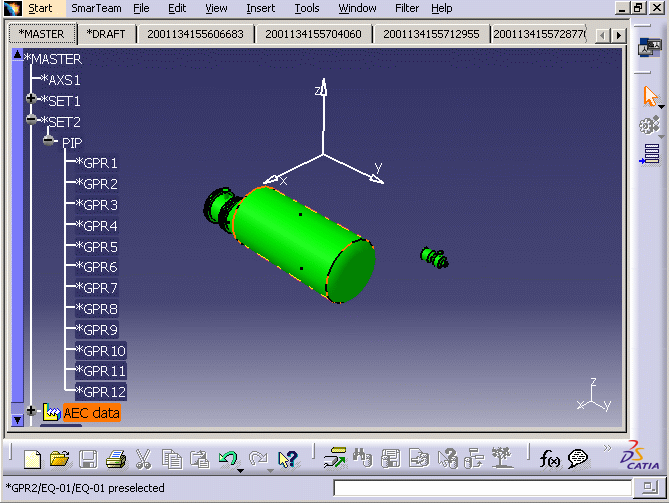
| 6. | To copy geometry from the master
workspace, select the *MASTER tab.
(There is a double link in the specification tree of V4 AEC models -
one for geometry and one for technology - that makes copy/paste operations
from the Master workspace more complex than copy/paste operations from
detail workspaces. Follow
these instructions carefully.)
Expand the specification tree and, for an AEC model, you see an entry
called "AEC data". You will
also see other tree entries for one or more Sets and subsets (e.g., PIP,
STR). Move your mouse
indicator over the geometry you want to copy.
Notice that the "AEC data" entry (for technology) in the tree
highlights. But this geometry has a second link in the tree that does not
highlight. It is the second
entry (for geometry) that you want to copy from.
(Non-AEC models do not have this double link, and so the single
entry for geometry will highlight normally.)
With your mouse over the geometry and "AEC data" highlighted, note
the GPR (or STR, etc.) number displayed in the lower left corner of your
CATIA window. In the example
below, it is *GPR2. Then, expand the SET and subset entries until you find the
SET that contains your desired geometry.
Remember your SET name (e.g., SET2).
Also, remember the part name that was displayed in the corner - in
this example it was EQ-01.
|
|
| 7. |
Define your V4 part geometry selection from the SET
specification tree entry. After multi-selecting all of the GPR's (or STR's,
etc.) from your desired SET (or simply by selecting the SET entry), and
with your geometry highlighted, select Edit + Copy.
|
|
| 8. | In the V5 part document, expand the specifications tree until you find the part body entry (e.g., PartBody, Layout, etc.). Double click on it to make it active. Paste your geometry to this part body. If you get a Paste error, you have lost your geometry and you need to go back to the V4 model and carefully Edit - Copy again, then go to the V5 document and paste it into the part body. (Some types of geometry, such as solids, may automatically create a new part body or save a new document.) | |
| 9. | Review the copied geometry and make sure it is what you want. You may want to hide the three planes (xy, yz, zx). Save the part. | |
|
|
||