Importing Parts from Other Software

This task shows you how to import parts into V5 from third-party software. The process involves exporting part data - attributes and values - to a prescribed XML format, and applying it to a template CATpart (or the physical shape of the part) created in V5. This process can also be used to create resolved parts and is especially useful when you have to create a large number of parts.


1. Create a set of template CATParts, corresponding to the parts that you want to import. You can create the parts by following instructions given in Building Parts. The parts must have the part type defined.
  • They can contain part geometry or they could also be empty, allowing you to add geometry later.
  • They should have the attributes defined - when you run the command explained below, only the attribute values from the imported part will be added or changed in the template CATPart. The attributes should already exist.
  • Pre-existing attributes will not be erased - they will remain after the procedure has been executed.
  • If the CATParts have multiple representations then they will have corresponding CATShape documents.
  • To create the body or physical shape of the part you will have to use the Part Design product, for which a separate license is required. You could, however, get by with the set of sample parts provided with this application if you remove any link to a design table.

Sample template CATPart documents are in the directory: ...intel_a\startup\EquipmentAndSystems\MigrationDirectory\PartGeneration\TemplateCATParts

2. Define a set of part definition files, or one file containing all part definitions. A part definition file is in XML format and must follow the structure as shown in the sample part definition file which is in:  ...MigrationDirectory\PartGeneration\PartDefinitions

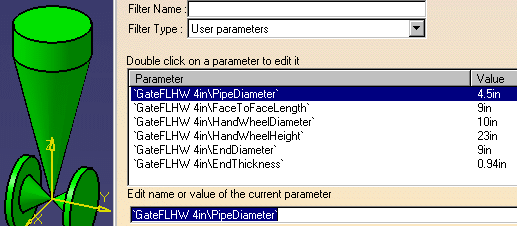
A portion of the sample part definition file is shown above.

  • You must have separate entries for each size. As you can see, GateFLHW 6 inches and GateFLHW 4 inches have separate entries.
  • The name you enter in the Part Name field will be used to name the part in this application (the part number).
  • The Type field refers to the part type as defined in the feature dictionary.
  • The Template field names the template CATPart document you are using.
  • You can use the same CATPart document for creating different sizes of that part.
  • You can change the attribute names and values as needed, but make sure you follow the format shown above.
  • You can also add a line showing a new attribute, again following this format.

You can use a special program - if you have one or can write one - to extract data from your parts. Or you can use the sample file mentioned above and enter the data in that file.

  3. Before you run the commands described in Steps 4 & 5, you must edit the script and enter the location of the Migration Directory (AECMIGR_DIRECTORYPATH) on your installation. The script is named CATAecPartGeneration.bat and is located in ...intel_a\code\command.  Using a text editor like Notepad, change the words  "Your Path" in the DIRECTORYPATH field to define the directory path in your installation. A portion of the part generation script is shown below.

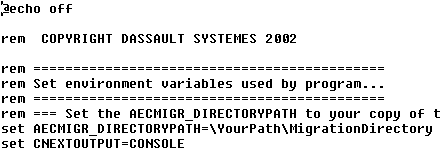
If the value of CNEXTOUTPUT equals CONSOLE then a window will inform you of the progress of the process. If you change the value of CONSOLE to a file name and location then the results of the process will be saved in that file.

4. After you have the part definition file and the template CATParts set up, you can run the command to add attributes to the template CATPart and generate resolved parts. The template will not change. Open a command prompt window and change to the directory: ...intel_a\code\command. Enter the following and press Enter: CATAecPartGeneration.bat    XXX.xml where XXX is the name of your part definition file. You can run this command several times, if you have more than one part definition file. You will get error messages if there are inconsistencies, such as if the part type in the template CATPart does not match the part type listed in the part definition file (this has been left in the sample part definition file as a test case). A message will inform you when the process is complete and the generated parts will be placed in the directory ...MigrationDirectory\PartGeneration\ResolvedCATParts.

For Unix run the command: CATAecPartGeneration.sh    XXX.xml

The two images below show the template CATPart "Gate Valve FLHW" and a 4-inch gate valve FLHW after it was generated using the sample part definition file. You can see that the attribute values and geometry have changed.


5. To place the parts you just generated in a catalog, move them from ...MigrationDirectory\PartGeneration\ResolvedCATParts  to your desired location. Then you can add them to a new or existing catalog, using the  create/modify catalog command.