Creating a Loose Part
|
|
This task explains how to create a loose part. | |
|
|
When creating loose parts, do not build a
graphic. No geometry is required on the loose part itself. You can still generate reports and check soft interference for the modeled loose instances without modeling the geometry on the reference loose part. |
|
|
|
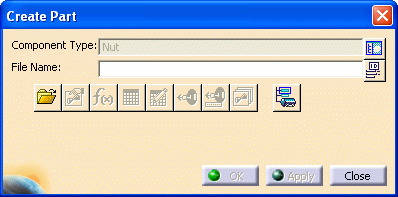
1. | To build a losoe part, click the
Build Part button
Click the Display Class Browser button
The Create Part dialog box redisplays, and the type of loose part displays in the Component Type field.
Enter a name in the File Name field and click Apply. The loose part you created displays in the specifications tree. |
| 2. | Click the Define Properties
button
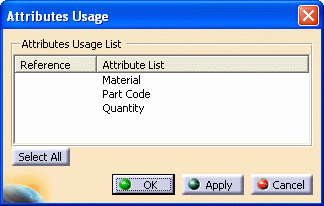
On the Multi-Discipline tab, click the Usage button and the Attributes Usage dialog box displays.
Select reference attributes from the Attribute List. Selecting an attribute displays X in the Reference column. Click OK to close the Attributes Usage dialog box. Back on the the Multi-Discipline tab, assign values to the reference attributes. Click OK to close the Properties dialog box. Click Close or OK to close the Create Part dialog box. |
|
|
|
Do not create connectors. The Create Part command automatically creates one logical connector that will be used when a loose part is associated with other parts. See Adding and Managing Loose Parts for more information. | |
| 3. | After building the part, save it. Select the part in the specifications tree, and click File - Save As from the menu bar. Select a location and click Save. |
|
| 4. | After you create all the
necessary loose parts, add these parts to the appropriate
application catalog.
For example, you can add loose parts to the Piping catalog, using the Create/Modify Catalog command. |
|
![]()