 |
This
task shows you how to create more shapes to complete the structural frame
of your foundation.
This second series of shapes will all be created using the point to
point method. To help define points, you will use the Point Definition
command. |
 |
1. |
Double-click the Shape
 icon.
icon.The Shape dialog box appears. If needed, click the right-hand icon
in the status bar to show the Point Definition dialog box. |
|
2. |
Set the
Type to Point to point in the Shape dialog box. |
| |
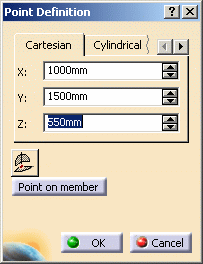
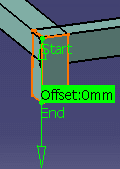
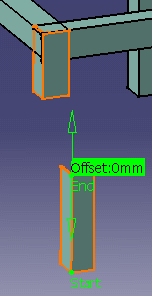
3. |
Click Point on
member in the Point Definition dialog box, then select the appropriate
shape, at the end nearest to which you want to create the current shape.
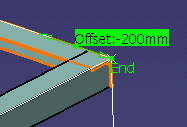
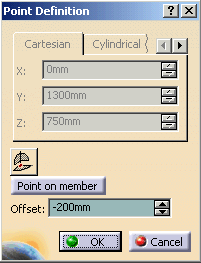
The Start and End points of the section are identified in the geometry
area; an offset of zero with respect to the selected end is displayed.
An offset field also appears in the Point Definition dialog box. |
 |
| |
4. |
Enter an
offset of -200mm in the Point Definition dialog
box, then click OK. |
| |
|
 |
 |
 |
You can offset from the end of a shape in two directions
by entering a negative or positive value. If you enter a negative value,
the offset will be applied toward the center of the shape. In the image
above, the offset point displays closer to the center. If you enter a
positive value, the offset will be in the other direction - away from the
center. |
| |
5. |
Define
the other end of the shape by entering X,Y,Z coordinates (0, 1300, 0) in
the Point Definition dialog box. The shape is positioned but not yet
correctly oriented. |
| |
6. |
In the
Shape dialog box, set the Anchor point to Top right and enter an
orientation of 270 degrees, then click OK. |
| |
|
 |
| |
|
You will
now create an assembly made of three shapes. |
|
7. |
Set the
Anchor point to Bottom left and Orientation to 270 degrees. |
| |
8. |
Select a
grid point as starting point, then define the second point 200 mm from this
point using the Point Definition dialog box. Note: The coordinates of the
selected point are shown in the Point Definition dialog box. |
| |
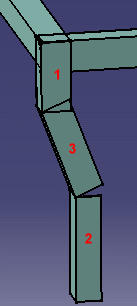
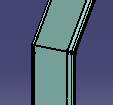
|
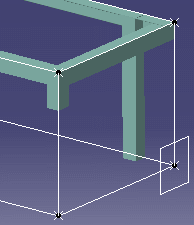 This is shape 1. |
 |
|
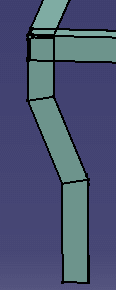
9. |
Create the bottom shape using the point-to-point method,
with the following criteria:
- Start coordinate 900, 1500, 300
- End coordinate 900, 1500, 0 mm
- Anchor point: Bottom left
- Orientation: 180 degrees
|
| |
10. |
Click
the Shape
icon. The shape (shape 3) you will now create will be defined with
respect to points on existing shapes (shapes 1 and 2). |
| |
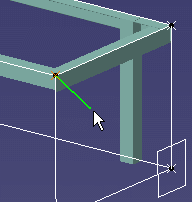
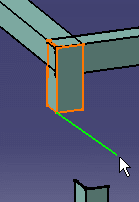
11. |
Click the Point on
member option in the Point Definition dialog box, then select a first shape
at one end of the shape. |
 |
| |
12. |
Keep the default
offset and click OK in the Point Definition dialog box. |
 |
| |
13. |
Click Point on
member to define the second point and select the end of the second shape,
then click OK. |
 |
| |
14. |
Check the anchor
point and orientation and, if necessary, adjust, then click OK
in the Shape dialog box.
- Anchor point: Bottom left
- Orientation: 0 degrees
|
 |
| |
|
You
will now trim shapes created to make smooth transitions. To do so, you
will need construction geometry to assist you. Construction geometry will
be created in a dedicated part. This geometry however must be created
without any links to existing shapes since it will also be used to trim
these very same shapes. |
| |
15. |
Uncheck
the Keep link with selected object option in the General tab page of the
Options dialog box (Tools -> Options -> Infrastructure -> Part
Infrastructure). |
| |
16. |
Switch
to the Wireframe and Surface Design workbench. A new part is added to the
specification tree. |
| |
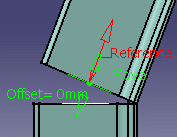
17. |
Create
two planes offset by 0mm from shape section surfaces of shapes 2 and 3.
 |
| |
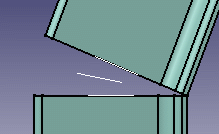
18. |
Intersect the two planes. The intersect will be used as rotation axis in
the next step. |
| |
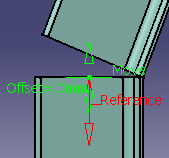
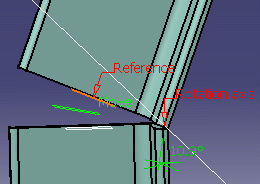
19. |
Create a
plane at half the angle between the above two planes. This is the plane to
which we will trim shapes 2 and 3. |
 |
|
Use the
Measure Between command to measure the angle. |
| |
|
 |
| |
20. |
In a new
geometrical set (Insert -> Geometrical set), create another trim
plane as above to trim shape 1 and the other end of shape 3. |
| |
21. |
Recheck
the Keep link with selected object option. You can now trim shapes. |
| |
22. |
Double-click the root product to return to the Structure Design workbench. |
| |
23. |
Double-click the
Cutback
 icon.
icon.The Cutback dialog box appears. |
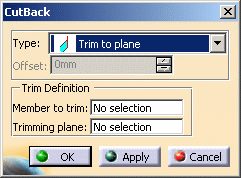 |
|
24. |
Select Trim to plane
in the Type list. |
| |
25. |
Select
one of the shapes (shape 3) to trim, then the trim plane and click OK
in the Cutback dialog box. |
| |
|
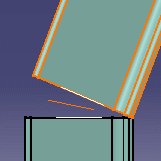
 |
| |
26. |
Repeat for shape 2. |
 |
| |
27. |
Trim
shape 1 and the other end of shape 3 to the other trim plane. |
| |
|
 |
| |
28. |
Repeat
to create an identical assembly comprising three shapes, starting 200 mm in
the Y direction along the corresponding horizontal shape. |
| |
|
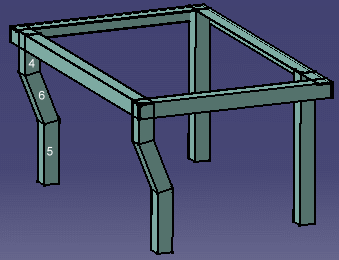 |
Shape 4:
- Anchor point: Bottom left
- Orientation: 270 degrees
Shape 5:
- Anchor point: Bottom left
- Orientation: 180 degrees
- Start coordinates: 900, 200, 0
- End coordinates: 900, 200, 300
Shape 6:
- Anchor point: Bottom left
- Orientation: 0 degrees
Note: You can use the same trim planes to trim the shapes of this
assembly. |
|
 |