This chamfer creation operation can be performed indifferently on the folded or unfolded view, and only one support (i.e. the chamfer when previewed should not lie over two supports).
Open the Corners1.CATPart document.
-
Click the Chamfer icon
 .
.
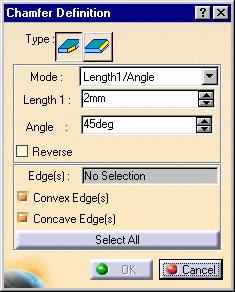
The Chamfer Definition dialog box is displayed.
-
Choose the chamfer Type:
-
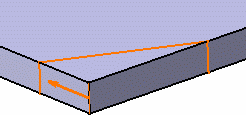
Thickness chamfer
 :
to be able to select edges that represent the thickness of the part
:
to be able to select edges that represent the thickness of the part
- Welding chamfer
 :
to be able to select edges that represent the area of the part where it
can be welded to another part.
:
to be able to select edges that represent the area of the part where it
can be welded to another part.
- using the Select All button: all convex or concave edges, or all edges of both types
- any edge manually selected
By default both buttons are checked, to allow the selection of any edge type whether manually or automatically.
- Once you have selected an edge, you can no longer modify this option, unless you cancel the selection.
- If you check the Convex Edge(s) button and you select a concave edge, a warning is issued indicating that you did not select an edge corresponding to the active type.
-
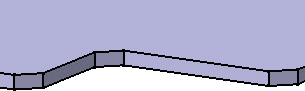
Select a sharp edge on a part.
The chamfer is previewed on the edge.
As soon as you selected one edge, the dialog box is updated and the Select All button changes to Cancel Selection.
-
Choose a chamfer Mode. You can either enter:
- a length value and an angle: the length is computed on one side of the edge and the angle from the chamfer's limit on the same side
- two lengths: these lengths are computed from the selected edge on both sides.
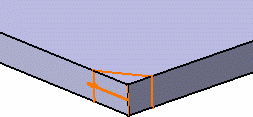
Use the arrow displayed on each edge to locally invert only one edge.
-
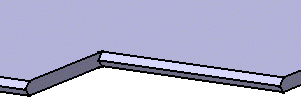
Click Cancel Selection then, make sure that both Convex Edge(s) and Concave Edge(s) buttons are checked, and click the Select All button.
All sharp edges of the part are selected, the Select All button taking into account the chosen type (convex, concave, or both) and the chamfers previewed.

-
Click OK in the dialog box.
All sharp edges of the part are cut off or filled in.
- When you select an edge that is not sharp, such as the edge between a wall and a bend for example, a warning is issued.
- As you select more edges, the Edge(s) field of the dialog box is updated.
- When using the Select All button, you select all edges (whether concave, convex, or both) present at the time. If when modifying the Sheet Metal part, new edges are created, these will not be automatically chamfered.
![]()