Creating a Hole Curve

This command is only available with the Automotive Body in White Templates product.

This task shows how to create the curve definition of a hole on a surface. 

Open the Hole1.CATPart document.
  1. Click Hole Curve .

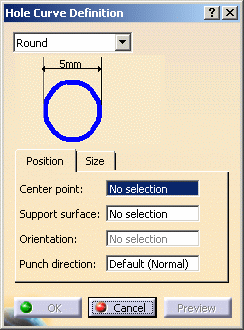
    The Hole Curve Definition dialog box is displayed.
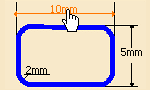
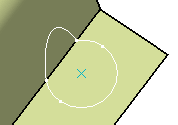
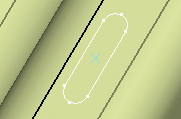
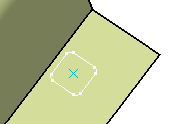
    Various shapes can be created:
    • round
    • slot (elongated hole)
    • rectangular
    • square
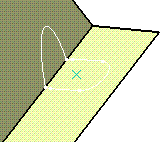
    The shape is defined on a plane and projected along a direction on the surface. In that case, the nearest projection is used to create the hole.
  2. Select the shape in the drop-down list.

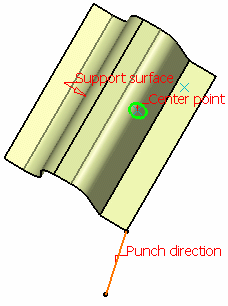
  3. Click a point to be the Center Point in the geometry or in the specification tree.

  4. Select the Support surface.

  5. Define the Orientation to align the major axis along a direction.

    You do not need to define an orientation for the round hole curves.
  6. Define the Punch direction.

    • If the point lies on the support surface, by default the punch direction is the normal direction at the centre point.
    • If the point does not lie on the support surface, you must define a punch direction.
  7. Click Preview.

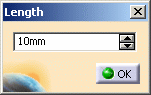
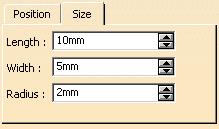
  8. Define the shape dimensions.

    To do so, either :
    • click the value to edit (here the rectangular length)

      The Length dialog box opens to let you modify the dimension.
    • click the Size tab.

      All dimensions related to the selected shape are displayed and can be modified.
       
    Some values must be greater than 0mm:
    • Diameter for the round hole curve
    • Length and width for the slot and rectangle hole curves
    • Length for the square hole curve
    Square and rectangle hole curves can be created with a null radius value: in this case, the hole is created without corner.
    Here are the parameters to be defined depending on the shape hole:
     
      Length

    Width

    Radius
    Round     X
    Slot X X  
    Rectangular X X X
    Square X   X
  9. Click OK to create the hole curve.

    The element (identified as Type Hole Curve.xxx) is added to the specification tree.

    Round hole curve
    Radius = 30mm, Punch Dir. = Default
      Slot hole curve
    Length = 30mm, Width = 15mm
    Orientation = zx plane, Punch Dir. = Line.1
     
    Rectangular hole curve
    Length = 40mm, Width = 10mm, Radius = 5mm
    Orientation = yz plane, Punch Dir. = Default
      Square hole curve
    Length = 15mm, Radius = 2mm, Punch Dir. = xy plane
     
 
If several solutions are possible, the solution with the minimum distance from the center point is chosen. If all distances are equal, an error message is issued, asking you to modify the point position.
This command can be used within the Functional Tolerancing & Annotation workbench in order to create associated dimensions and tolerances for a hole curve feature.
For further information, refer to the Creating an Automatic Constructed Geometry in the 3D Functional Tolerancing & Annotation documentation.