 |
To be able to use ClearCoat
360 technology, download the ClearCoat 360 runtime library (named "libcc360.so")
from the following site:
http://www.sgi.com/software/clearcoat
This library must be installed in the Version 5 filetree containing
runtime code (...code/bin).
To create ClearCoat files, use the Sphere Maps generator SMGen. SMGen
ordering instructions are available from the following site:
http://www.sgi.com/software/clearcoat
|

|
-
Open your document then access the material texture properties.
-
Select ClearCoat 360 from the Type
list as shown below:
-
Click the
 button to open the ClearCoat 360 Texture Generator dialog box:
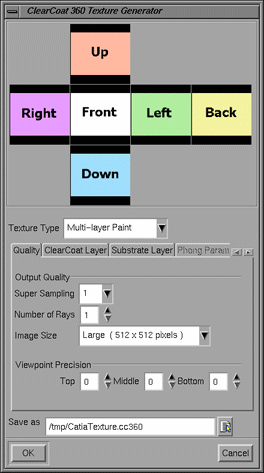 |
| This dialog box lets you choose the type of
ClearCoat 360 texture you want to generate. The tabs displayed
below are accessible according to the type you select, except
Quality which is common to all texture types. |
-
To create your own environment image, just click each
environment wall (i.e. "Up", "Back", etc.).
In the upper part of the dialog box then navigate
to the desired image using the File Selection dialog
box.
Note that only rbg and
tif formats are supported. |
-
Select the type of texture to be generated from the
Texture Type list:
- Multi-layer Paint
:
produces a realistic multi-layer paint. This type lets you access
the Quality, ClearCoat Layer and
Substrate Layer tabs
- Mirror:
produces a perfect BRDF mirror (for Bidirectional Reflection
Distribution Function). This type lets you access the
Quality tab
- Spherical mirror
:
produces a perfect normal reflector. This type lets you access
the Quality tab
- Phong effect
:
creates a Phong-type render. This type lets you access the
Quality and Phong Parameters tabs.
|
 |
Only
.tif images of type "float"
can be used to generate Phong-type textures. To convert your .tif
images to this format, you can use a SGI utility which lets you
open then re-save your images in TIF float format. |
| The number of tabs you can access
varies according to the texture type you select, here is a
description of each tab: |
-
Use the Quality tab to define the following
parameters:
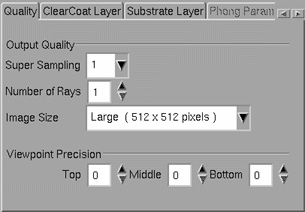 |
- Super Sampling
:
corresponds to the sampling number
- Number of Rays:
sets the number of rays to be sent
- Image Size:
sets the texture resolution (either Large,
Medium or Small)
- Viewpoint Precision:
defines the viewpoint repartition which is divided into
three layers: top, middle and bottom of an icohedron, "0"
representing the level of the icohedron. Each value higher than
"0" adds a subdivision to the icohedron.
|
-
Use the ClearCoat Layer tab to define the
following parameters:
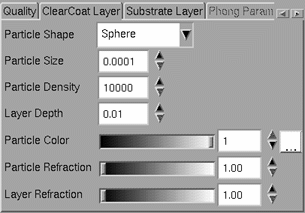 |
- Particle Shape
:
defines the shape of ClearCoat 360 particles. It can
be either spherical, the shape of a round platelet or the
shape of a square platelet
- Particle Size:
defines the size of the particles in millimeters
- Particle Density:
defines the number of particles per square millimeters
- Layer Depth:
defines the depth of the layer in millimeters
- Particle Color:
lets you define the color luminosity using the slider or
the box. You can also click
 to choose another
color for particles (the default color is white). to choose another
color for particles (the default color is white).
- Particle Refraction:
defines the refraction coefficient for particles, i.e.
the degree of light passing through particles. You can enter a
value comprised between 1 and 2. If set to 1, there is no light
distortion
- Layer Refraction:
defines the refraction coefficient for the layer, i.e. the
degree of light passing through the layer.
|
-
Use the Substrate Layer tab to define the
following parameters:
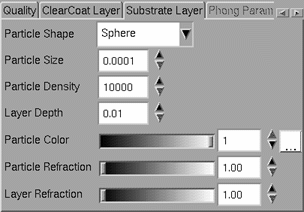 |
| These parameters
are identical to those displayed in the ClearCoat Layer
tab. Refer to previous step for detailed information. |
-
Use the Phong Parameters tab to define the
following parameters:
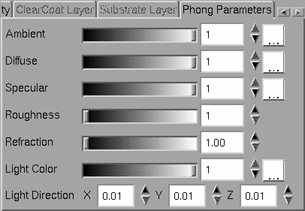 |
- Ambient
: defines
the intensity of light diffused in any direction by the object,
even if not lit by any light source. You can enter a value
comprised between 0 and 1 for this coefficient
- Diffuse: defines
the intensity of light diffused by the object when lit by light
sources. You can enter a value comprised between 0 and 1
- Specular: defines
the intensity and color of light reflected in one particular
direction (highlights)
Typically, a polished object would have a high value for the
specular reflectance coefficient, while a more mat surface would
have a lower one
- Roughness: defines
the dullness of the object, i.e. the size of the reflecting
zone.
Set the value to a minimum to generate very sharp highlights on
very shiny surfaces. Set the shininess to a higher value to
generate large specular spots creating a duller effect on rougher
surfaces
- Refraction: defines
the degree of light refraction passing through the object. You
can enter a value comprised between 1 and 2
- Light Color:
use the slider or the box to modify the light luminosity,
then click
 if you
want to choose another color (the default color is white) if you
want to choose another color (the default color is white)
- Light Direction:
defines the light direction along X, Y and Z
axes to specify the point at which the light source points.
|
-
Once the parameters have
been defined, indicate the name and location of the texture to be
generated in the Save As box.
|
You can also click the
 button then navigate to the desired location.
 |
-
Click OK to validate.
| A window opens to
inform you that the texture computation starts: |
 |
|
![]()