 |
This task shows how to export
your V4 standards and specifications data to V5. |
 |
You need to export the data
associated with your V4 standards - such as ASTL - and specifications, like
CS150R, so that when your V4 catalog parts and design models are converted
to V5 they have access to this data. |
 |
1. |
To begin with you need to set the working units in your V4
session so that they are the same as contained in your tables: if the
length in the tables is in inches you should set the length to inches in
your session. Plane angle should in most cases be degrees. |
|
|
2. |
In the PROSETUP function open the Tables menu and the Import Export
submenu.

|
|
3. |
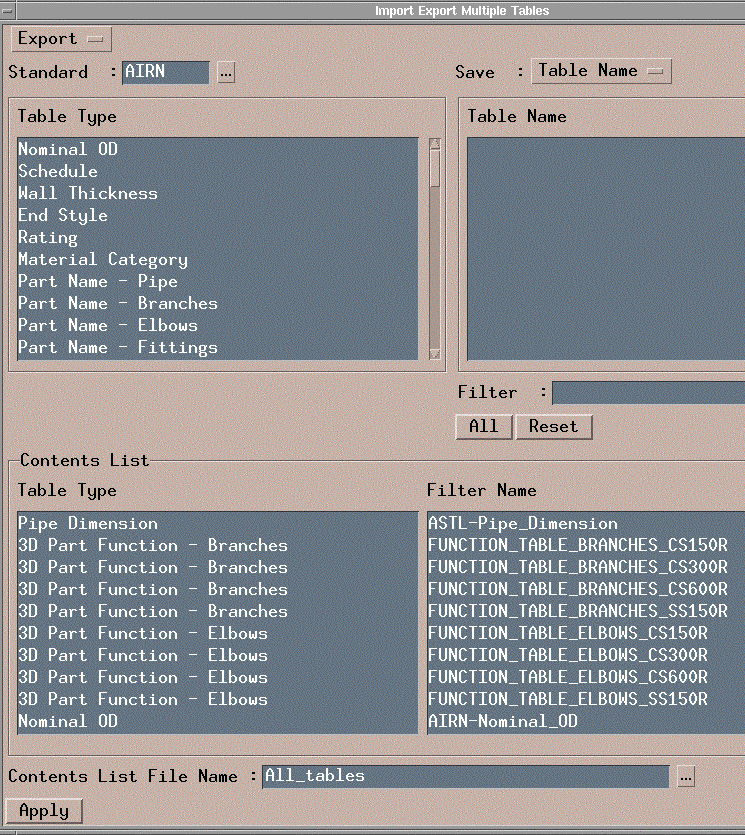
Set the Import/Export toggle switch to Export. |
|
4. |
Select a standard, such as ASTL. |
|
5. |
Enter a file name, say All_tables, in the Content List File
Name field. The table type and table name of all tables that are exported
will be included in this file. The file itself will need to be moved to V5
and is needed in the migration process. |
|
6. |
Select all the tables you want to export in the Table Type
list. The tables will display in the Contents List as you select them. If
more than one table is associated with a table type then the table names
will display. Select all or as many as you need. You do not need to export
certain tables. These are: End dimension, Part dimension, End symbol
definition, Pipe support, Insulation specs and ISO part mapping. |
|
7. |
When you have selected all the tables for one standard you
can change to another standard and repeat the process with the tables
associated with it. You may not need to select your specifications tables
again. |
|
8. |
When you have selected the tables you need from all your
standards click the Apply button. All the tables you selected will be
placed in the ...setup\PRO\table
directory. The file All-tables will also be placed there. |
|
9. |
Go to the PIPSETUP function, and the menu Catalog - Pipe
Spc - Create. Select a Pipe Spec name and note which tables your
specification uses. One way to determine this is to note the table name -
the name of the specification will be included in it (not all tables are
named this way). Note the table names because they are needed in a later
step. |
|
10. |
Transfer, by ftp or any other method, all the tables as
well as the All_tables file to your V5 application. They should
be placed in the following directory: intel_a\startup\EquipmentAndSystems\MigrationDirectory\PipingSystems\
V4_Exported_Tables. |
|
11. |
You now need to edit the All-tables file (using
a text editor like Notepad) to include the name of the V5 directory where
each table must be placed. It is best to make a copy of the All_tables
file and edit the copy. The entries as exported from V4 will look like
this:
/*Table,Filter*/
Nominal OD,ASTL-Nominal_OD
Schedule,ASTL-Schedule
Wall Thickness,ASTL-Wall_Thickness
End Style,ASTL-End_Style
Rating,ASTL-Rating
Material Category,ASTL-Material_Category
You need to change the header and add a comma and the name of the
directory as a third field. The directory name must either be a
standard name (ASTL) or specification name (CS150R) for the transparent
automatic parts, compatibility rules and process function mapping rules
tables. For an example see MigrationDirectory\Piping
Systems\V4_Exported_Tables\V5_TableMigrationList_sample.txt.
V4 Table Type,V4 Table Name,V5 Folder Name
Nominal OD,ASTL-Nominal_OD ,ASTL
Schedule,ASTL-Schedule ,ASTL
Wall Thickness,ASTL-Wall_Thickness ,ASTL
End Style,ASTL-End_Style ,ASTL
Rating,ASTL-Rating ,ASTL
Material Category,ASTL-Material_Category,ASTL |
|
12. |
If a table is used in more than one specification then you
may have to duplicate the rows. Refer to the notes you made in Step 9 to
identify the tables used by a specification. In the example below,
the table 3D Part Function - In-line Instrument,
FUNCTION_TABLE_INLINE_INSTRUMENT does not mention any specifications.
If you want to use it in all four specifications then you must duplicate
the rows and add the specification name to each row.
3D Part Function - Inline
Instrument,FUNCTION_TABLE_INLINE_INSTRUMENT,CS150R
3D Part Function - Inline
Instrument,FUNCTION_TABLE_INLINE_INSTRUMENT,CS300R
3D Part Function - Inline
Instrument,FUNCTION_TABLE_INLINE_INSTRUMENT,CS600R
3D Part Function - Inline
Instrument,FUNCTION_TABLE_INLINE_INSTRUMENT,SS150R
3D Part Function - In-line Instrument,FUNCTION_TABLE_INLINE_INSTRUMENT
Make sure there are no trailing blanks at the end of each row. |
|
13. |
Open a command prompt window and change directories to
intel_a\code\command.
Enter the following line and hit Enter: CATAecV4ToV5PipingTables.bat
(name of file) where (name of file) is the name of the file which you
edited in Step 10. It should include the file extension. You need to edit
the bat file if you use a standard that is not named ASTL. Find the letters
ASTL in the file and change them to the name of your standard.
All the tables will be placed in the following V5 directory (unless you
set the AECMIGR_DIRECTORYPATH variable to a different location):
intel_a\startup\EquipmentAndSystems\MigrationDirectory\PipingSystems\
V5_Migrated_Tables |
|
14. |
Move the tables to wherever you need to have them. You will
need to add references to these tables in the appropriate CATProduct and
catalog files. See MigrationDirectory\Piping
for an example. |
