 |
-
Double-click MoldedPart in the
specification tree.
-
Click
Sketcher
 and select the xy-plane in the specification tree.
-
Click
Project 3D Elements
 and select the gate that you just created (yellow square).
This projects the gate into the xy plane, i.e. the sketcher plane.
-
Sketch the runner path from the gate you have
just created like this:
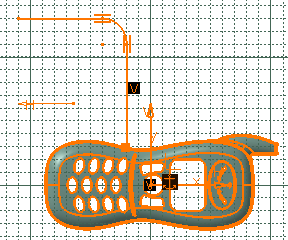
The runner path is made of lines and arcs, that should
be continuous in tangency.
This sketch will be the guide (Layout) along which a
profile (Section) is swept to create the runner .
-
Click
 to exit the Sketcher and return to the product (double-click
Product in the specification tree).
to exit the Sketcher and return to the product (double-click
Product in the specification tree).
-
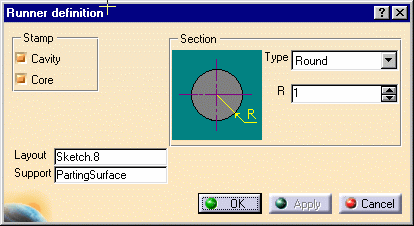
Click
Add Runner  . .
-
The runner definition dialog box is displayed. Choose:
- to stamp the runner in the core and in the cavity,
- Round Type with a radius of 1,
- the sketch you just created as the Layout.
|
 |
-
Click OK to create the runner.
|