The data logged in the generated report as well as the report format depend on the rule base settings.
-
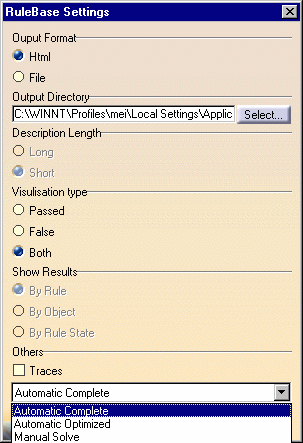
Expand the specification tree, right-click the rule base object under Relations, and select
Rulebase Object > Settings . The RuleBase Settings dialog box opens:
-
Refer to what follows to fill in the areas:
|
-
Click OK to apply the settings to the rule base.
-
Click the
 icon to find out what holes are not activated. The html page displayed
provides you with the ratio of the holes that fulfill the check. 75% of
the holes are activated - Click the check name hyperlink to obtain
details on the features satisfying or not satisfying the check. Note the
Help message which is displayed in column 5 of the check report.
icon to find out what holes are not activated. The html page displayed
provides you with the ratio of the holes that fulfill the check. 75% of
the holes are activated - Click the check name hyperlink to obtain
details on the features satisfying or not satisfying the check. Note the
Help message which is displayed in column 5 of the check report. -
In the specification tree, right-click the check, select Correct Function and perform a Solve. The holes are activated and the part is updated. In the specification tree, the check icon is now green.