![]()
1.
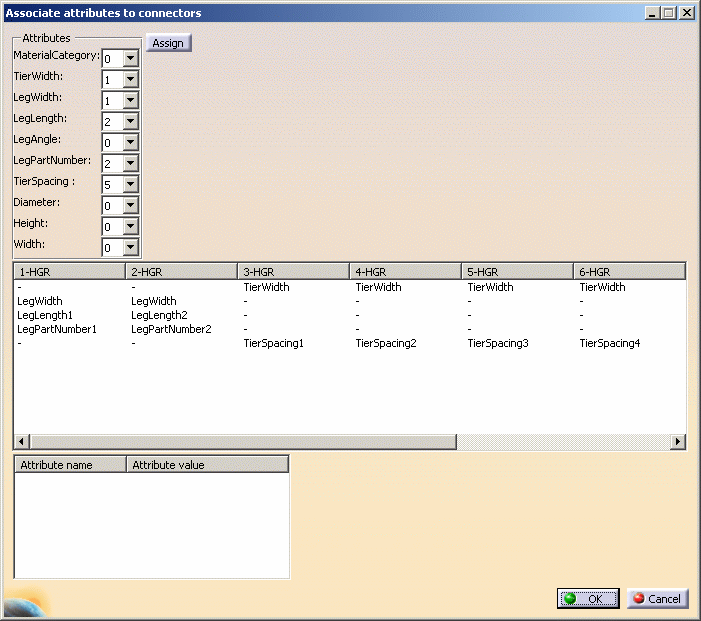
ATTRIBUTES: This section of the box displays all the attributes entered in the Connector Attributes file (see below). You will need to decide which ones you want to associate to specific connectors. The drop down arrow allows you to select how many of each attribute you want to be available to you - leg length has two attributes in this example. Click the down arrow and make your selection. Click Assign when you have finished.
The second pane displays the connectors on your part and the attributes associated with them. In the example above, for instance, Connector 1 is associated with LegLength1, while Connector 2 is associated with LegLength2.
The third pane will display how many of each type of attribute are associated with the part, and the values, if any, assigned to them. You can also use it to change the attribute assigned to each connector. To display the attributes, select one of the attributes in the second pane, say LegLength. The window displays all the available leg lengths on the part and their values.
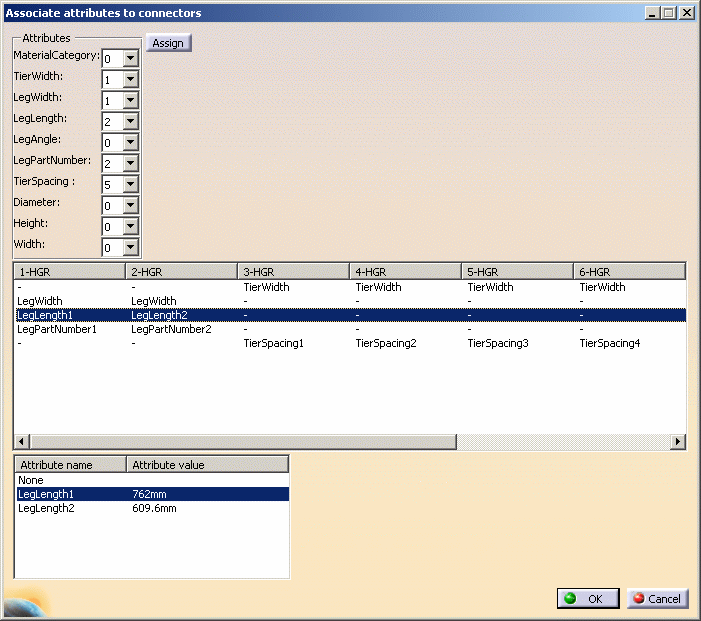
To change the attribute associated with a connector: Click on the attribute beneath the connector in the second pane. Then, in the third pane, select the attribute you want to replace it with. In the example above, for Connector 1, if you want to change LegLength1 to LegLength2, select LegLength1 in the second pane and LegLength2 in the third pane.
Click OK when you have finished.
CONNECTOR ATTRIBUTES FILE
The Connector Attributes file
controls the attributes that are displayed in the Associate Attributes
to Connectors dialog box. A part may have dozens or even
hundreds of attributes associated with it. Since only some of these need to
be associated with connectors, the Connector Attributes file gives you a
way of controlling the number. There are sample ConnectorAttributes.txt
files for each application, located in the directory ...intel_a\startup\EquipmentAndSystems\XXX\
YYY\ComponentCatalogs where XXX is the discipline, like Piping, and
YYY is the application, like Piping Design.
Sample files for Equipment Arrangement are located a little differently:
...intel_a\startup\EquipmentAndSystems\Equipment\XXX\
EquipmentArrangement\ComponentCatalogs where XXX is a discipline like
Piping. This simply allows for placing different types of equipment (piping
equipment, HVAC equipment etc.) in their own directories.
If you want to display more or different attributes in the Associate Attributes to Connectors dialog box then make appropriate changes in the ConnectorAttributes.txt file using a text editor like WordPad.
The location of the Connector Attributes file must be correctly referenced in the project resource management file.
![]()