You can find here the recommended methodology to mesh seams using the compatible mode.
-
The two supports must have the same number of nodes.
-
To create an analysis connection, you have to installed the Generative Assembly Structural Analysis (GAS) product
 .
.
-
Select Start > Analysis and Simulation > Advanced Meshing Tools.
The New Analysis Case dialog box appears.
Click OK. -
Create a line analysis connection.
-
Click Line Analysis Connection
 in the Analysis Support toolbar.
 -
Select:
- Fill.1/Part1 as First Component
- Fill.1/Part2 as Second Component
- Line.2/Part3 as Lines
-
Click OK in the Line Analysis Connection dialog box.

For more details about analysis connections, refer to Analysis Connections chapter in the Generative Structural Analysis User's Guide. -
-
Right-click the Analysis Connection.1 object and select Update all analysis connections.
-
Mesh the first support.
To do this:-
Click Advanced Surface Mesher
 .
. -
Select the Part2.2 -> Fill.1 feature in the specification tree.
-
Set the following parameters:
- Quadrangle as Mesh type option
- Linear as Element type option
- 5 mm as Mesh size value
- 0.5 mm as Constraint sag value.
-
Click OK in the Global Parameters dialog box.
-
Click Add/Remove Constraints
 in the Local Specifications toolbar and select the
Curves tab.
in the Local Specifications toolbar and select the
Curves tab. -
Select the Line Analysis Connection.1 object in the specification tree.

The Capture mesh edges option should be deactivated. 
-
Click OK in the Add/Remove Constraints dialog box.
-
Click Exit
 to exit the Advanced Surface Mesher workshop.
-
-
Mesh the second support.
To do this:-
Click Advanced Surface Mesher
. -
Select the Part2.1 -> Fill.1 feature in the specification tree.
-
Set the following parameters:
- Quadrangle as Mesh type option
- Linear as Element type option
- 7 mm as Mesh size value
- 0.7 mm as Constraint sag value.
-
Click OK in the Global Parameters dialog box.
-
Click Add/Remove Constraints
in the Local Specifications toolbar and select the
Curves tab. -
Select the Capture mesh edges check box in the Add/Remove Constraints dialog box.
-
Select the Line Analysis Connection.1 object in the specification tree.
The Capture dialog box appears.
Enter 5mm as Tolerance value.
Do not select the Coincidence check box. -
Click Apply and then OK in the Capture dialog box.
-
Click OK in the Add/Remove Constraints dialog box.
-
Click Exit
to exit the Advanced Surface Mesher workshop.
-
-
Click Seam Welding Connection Mesh
 in the Welding Meshing Methods toolbar.
 -
Set the following parameters in the Seam Welding Connection Mesh dialog box:
- Shell as Connection modeling option
- Line Analysis Connection.1 as support
- Compatible as Mesh Compatibility option.
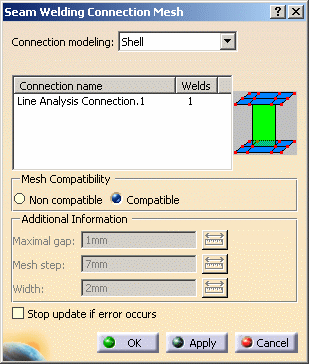
-
Click Apply and then OK in the Seam Welding Connection Mesh dialog box.