- Some or all hole dimensions from a hole parameters (except if these parameters cannot be associated with an existing geometrical element to generate dimensions: diameter of a tapered hole out of the part, depth for a blind hole setting a "through hole", etc).
- Pad/Pocket length; if two limits are defined, two dimensions will be generated between the sketch plane and each limiting face, and sketch constraints.
- Multi-Pad/Multi-Pocket lengths, and sketch constraints.
- Shaft/Groove distance constraints that are parallel or perpendicular
to the shaft/groove axis direction,
distance between shaft/groove axis and point and/or straight line and/or circle (arc or complete) as a half dimension diameter if the shaft/groove is not complete (value of the single angle or total of the 2 less than 360 degrees, as regular diameter if the shaft/groove is complete, angle, and sketch constraints. - Chamfer features; dimensions are generated according to the Part Design chamfer feature definition: for a chamfer with a length x length definition, the dimension format will be distance x distance, whereas for a chamfer with a length x angle definition, the dimension format will be distance x angle dimension. However, you should be aware of the fact that if tolerances are applied to chamfer parameters, only the tolerance applied to the first parameter will be generated. Chamfer dimensions cannot be edited, but they can be modified via the Dimension Properties toolbar and the Edit Properties command.
- Thread features; thread diameter, depth and pitch
parameter dimensions can be generated. Dimension generation automatically
generates a thread symbolic representation.
Note that:- any tolerance attached to the pitch or diameter parameter will not be generated.
- generating a pitch parameter dimension requires the generation of the corresponding thread diameter parameter dimension.
- if the thread is not a metric one, the prefix will be a diameter symbol instead of the letter M.
- You could select User Feature and explore them in order
to find Part features allowed in Generative command.
The command will recursively search each compatible internal Part features (in the same way User Feature containing other User Features) in order to show parameters (if nothing could be analyzed by generative command, no parameter will appear).
Moreover, user can immediately select all of them in generative command list as if User Feature does not exist.
Only published parameters (during User Feature creation) are seen in list and corresponding dimensions could be created.
- Dimensions are associated with the design of a part, including the Mean Dimension behavior.
- When parameter tolerances are still defined, they are set to the dimension tolerances.
- Modifying dimension tolerances modifies the parameter tolerances and vice-versa.
- A generated dimension is always created in an annotation plane
parallel to the related feature internal parameter plane and this
annotation plane is not necessarily the active annotation plane:
- If an annotation plane parallel to the feature internal parameter plane already exists, the dimension is created in this annotation plane,
- Otherwise a new annotation plane is created parallel to the feature internal parameter plane.
- Improve the highlight of the related geometry, see Highlighting of the Related Geometry for 3D Annotation.
-
Click Generative Dimension
 in the Annotations
toolbar.
in the Annotations
toolbar.The Generate 3D Tolerancing Dimensions dialog box appears. 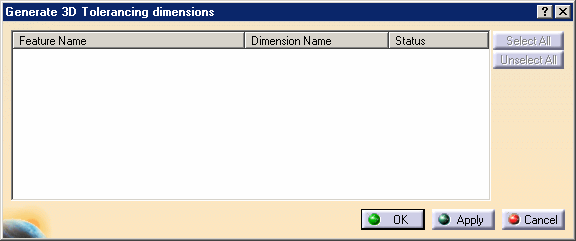
-
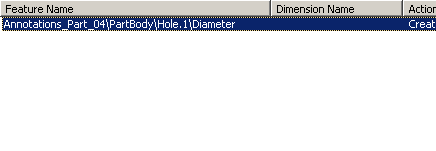
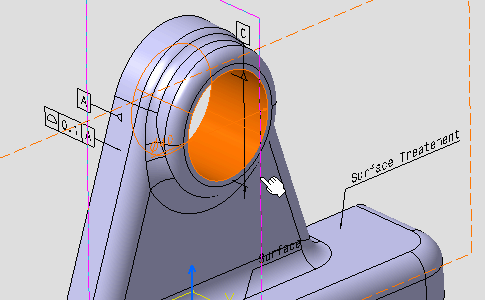
Select the hole as shown on the part.

The hole parameter is displayed in the dialog box. 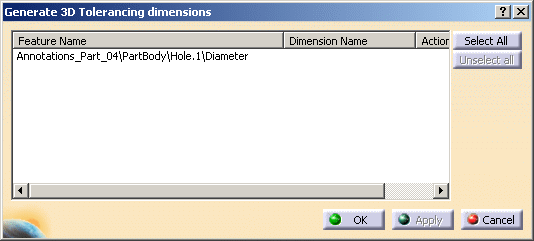
Also, the hole parameter is shown on the part. 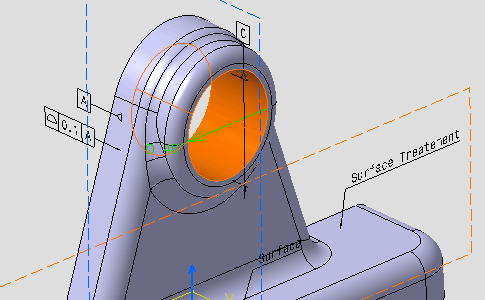
-
Select the Diameter parameter in the dialog box. You can also select the parameter on the geometry.
-
Click OK in the dialog box.
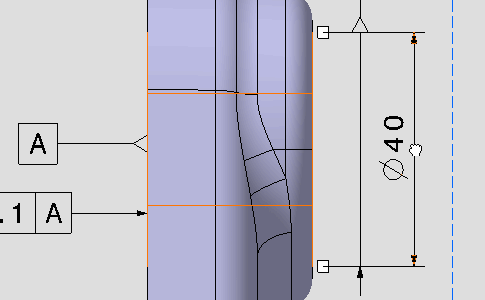
The diameter dimension is created. 
-
Right-click the dimension and select Transfer To View/Annotation Plane from the contextual menu.
-
Select Front View.2 annotation plane.
The dimension is transferred. 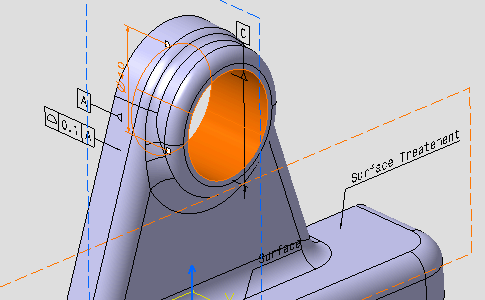
-
Drag the dimension.
-
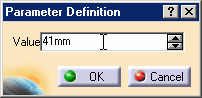
Right-click the dimension and select Edit Generative Parameter from the contextual menu.

The Parameter Definition dialog box appears.
This dialog box allows you to modify the hole parameter and edit the part.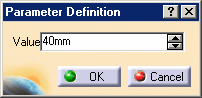
-
Set the value to 41mm.
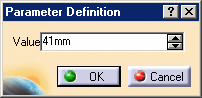
The part turns red because it has been modified but not updated.
When you click OK, the part will be updated (when the Part update is automatic update).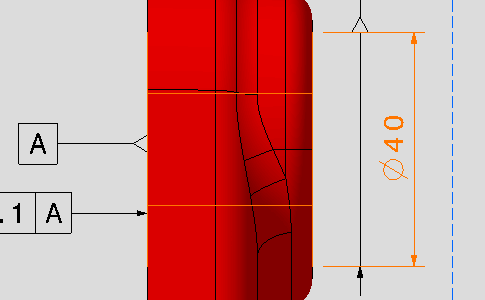
-
Click OK, then it is automatically updated (when the Part update is automatic update).
The part hole and diameter dimension are modified. 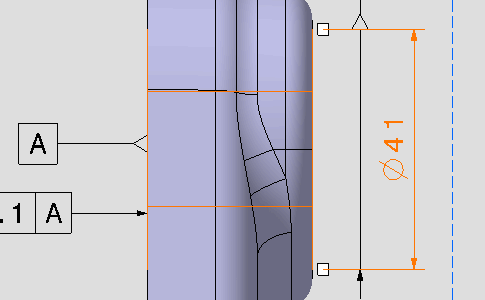
-
Right-click the dimension and select Edit Generative Parameter from the contextual menu again.
-
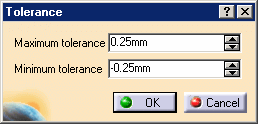
Right-click in the value field and select the Add tolerance... from the contextual menu.
The Tolerance dialog box appears.
This dialog box allows you to modify the hole parameter tolerances.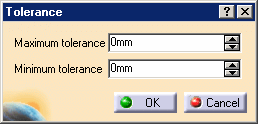
-
Set the tolerances to 0.5 and -0.5 .
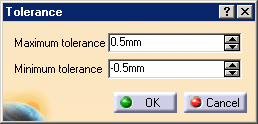
Tolerances are displayed on the dimension. 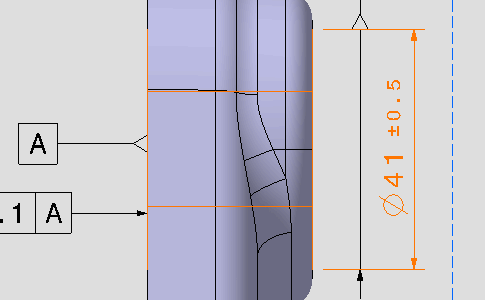
-
Click OK in the Tolerance and Parameter Definition dialog boxes.
-
Modify the tolerances in the Dimension Properties toolbar to +-0.25 .
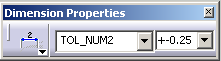
Tolerances are updated on the dimension. 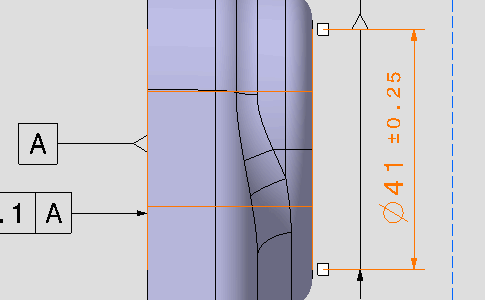
-
Right-click the dimension and select Edit Generative Parameter from the contextual menu again.