This task shows how to compute with adaptivity.
Adaptivity management consists of setting global adaptivity specifications and computing adaptive solutions.
- The Adaptivity functionalities are only available with a static analysis solution (without multi loads) or a combined solution that references a static analysis solution (without multi loads).
- To compute with adaptivity, you need to update the solutions.
- A global adaptivity and optionally a local adaptivity must have been defined.
- The former adaptivity specifications (created before V5R12) can be
edited but they can not be computed with adaptivity.
If you modify these specifications and launch a computation with adaptivity, a warning message informs you that these specifications will not be taken into account. You have to create new adaptivity specifications.
Open the
sample07_2.CATAnalysis document from the samples directory.
In this particular example, a global adaptivity and a local adaptivity have
been already defined.
-
You can compute the static solution.
To know more, refer to Computing Static Solutions.
-
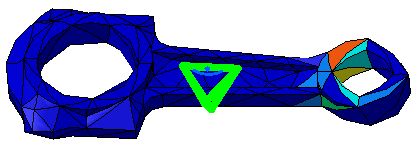
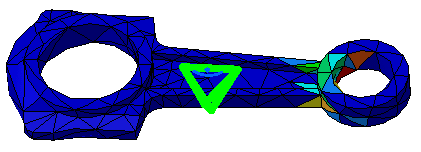
Activate the Estimated local error image to visualize the quality elements.
To do this, right-click the Estimated local error image in the specification tree and select the Activate/Deactivate contextual menu.
-
Double-click the Global Adaptivity.1 object in the specification tree to visualize the current error.
The Global Adaptivity appears.
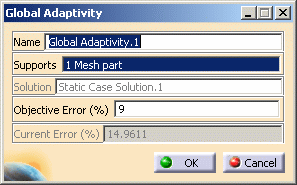
Click Cancel to close the Global Adaptivity dialog box.
-
Double-click the Local Adaptivity.1 object in the specification tree.
The Local Adaptivity appears.
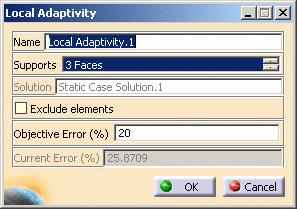
Click Cancel to close the Local Adaptivity dialog box.
-
Click Compute with Adaptivity
 in the Compute toolbar.
The Adaptivity Process Parameters dialog box appears.
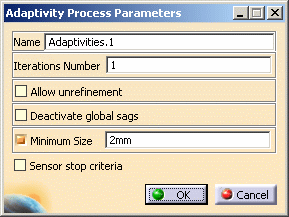
- Name: gives you the name of the adaptivity set you want to compute.
- Iterations Number: lets you specify the maximum number of iterations you want to perform to reach the objective error you have defined.
- Allow unrefinement: lets you choose to allow
refinement or not.

If you allow unrefinement, the global sizes of the mesh parts may be modified.
- Deactivate global sags: lets you choose to ignore
the global sags.
Existing global sags will be deactivated.
- Minimum size: lets you specify a minimum mesh size.
The objective size must be superior to the mesh size.
- Sensor stop criteria: lets you specify a sensor.
If you select this check box, the Parameter Convergence frame appears:
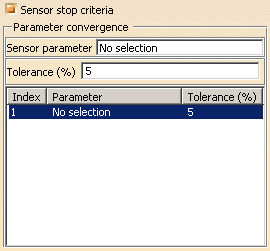
- Sensor parameter: lets you select the sensors.
Multi-selection of sensor criteria is available.
- Tolerance (%): lets you specify the tolerance value.
- Sensor parameter: lets you select the sensors.
To sum up, the adaptivity process stops as soon as:
-
the maximum number of iterations is reached
-
or all objective errors are reached
-
or all sensors converged.
-
Clear the Minimum size check box.
-
Select the Sensor stop criteria check box in the Adaptivity Process Parameters dialog box.
-
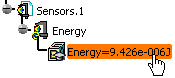
Activate the Sensor parameter field, select a sensor and enter a Tolerance value (in %).
In this particular example, select the Energy sensor as shown below:

You can add other sensor criteria, delete a sensor criteria or delete all the sensor criteria.
To do this, right-click a line and select the desired contextual menu: Add, Delete or Delete All.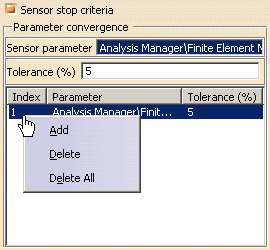
-
Click OK in the Adaptivity Process Parameters dialog box.
The Computation Status dialog box appears.
At the end of the computation, a Warnings message appears to inform you that the selected sensor has not converged and the objective error is not reached.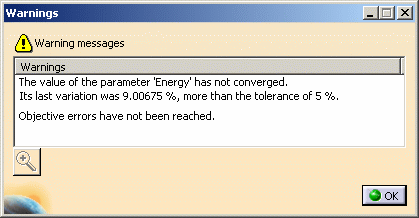
-
Click OK in the Warnings message.
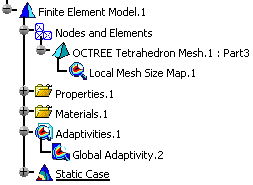
Note that a Local Mesh Size Map.1 object has been created under OCTREE Tetrahedron Mesh.1 in the specification tree and that the Adaptivities.1 set is now valid.
-
Activate the Estimated local error image to visualize the quality elements.
To do this, right-click the Estimated local error image in the specification tree and select the Activate/Deactivate contextual menu.
-
Double-click the Global Adaptivity.1 object in the specification tree to visualize the current error value.
The Global Adaptivity dialog box appears.

Note that: after the first iteration of computation with adaptivity, the objective error you have specified (9%) is not reached.
-
Click OK in the Global Adaptivity dialog box.
-
Click Compute with Adaptivity
.The Adaptivity Process Parameters dialog box appears.
-
Enter 2 as Iterations Number value and click OK in the Adaptivity Process.
-
Double-click the Global Adaptivity.1 object in the specification tree to visualize the current error value.
The Global Adaptivity dialog box appears.

The objective global error you have specified is reached.
-
Double-click the Local Adaptivity.1 object in the specification tree.
The Local Adaptivity appears.

The objective local error you have specified is reached.
-
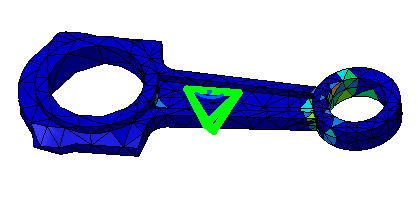
Activate the Estimated local error image to visualize the quality elements.
![]()