This task shows how to create a Local Mesh Sag specification on a mesh part.
The Mesh Part objects set contains all user specifications relative to the Mesh. In particular, global size and sag specifications, as well as global element order specifications.
Local Mesh Sags are local specifications relative to the maximum distance between the element boundaries and the boundary of the system.
Open the sample00.CATAnalysis document from the samples directory for this task.
-
Go to View > Render Style > Customize View and make sure the Shading, Outlines and Materials options are active in the Custom View Modes dialog box.
-
Click Local Mesh Sag
 in the Model Manager toolbar.
The Local Mesh Sag dialog box appears.


In the case of an assembly, you have to select in the specification tree the mesh part of which you want to modify the sag (Nodes and Elements set).
You can change the name of the Local Sag by editing the Name field.
-
Enter an element sag in the Value field.
You can use the ruler button on the right of the field to enter a distance between two supports by selecting them in sequence.
-
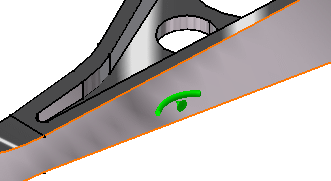
Select a geometry for applying a local sag.
A symbol representing the Local Sag is visualized on the support.
-
Click OK.
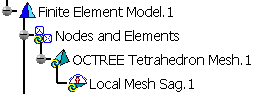
Local Mesh Sag.1 appears in the specification tree under the active mesh part.
You can apply in sequence several local mesh sag specifications to the system. A separate object will be created for each specification in the specification tree.
![]()