This task shows how to create a Rigid Connection between two parts.
Only available with the Generative Assembly Structural Analysis (GAS) product.
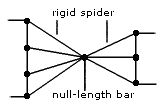
A rigid connection is the link between two bodies which are stiffened and fastened together at their common boundary, and will behave as if their interface was infinitely rigid. Since bodies can be meshed independently, the Rigid Connection is designed to handle incompatible meshes.
The Rigid Connection relations do not take into account the elastic deformability of the interfaces.
The program proceeds as follows:
-
a null-length rigid bar is created at the midpoint between the centroids of the two systems of points represented by the nodes of the two meshes (or at handler point, if specified).

In case of a Point/Point connection, the length of the rigid bar is non null.
-
each extremity of the null-length rigid bar is connected by a rigid spider element to all nodes of the first and of the second meshes.
-
a set of rig-beam relations is generated between the central node degree of freedom and the connected nodes degree of freedom.
Thus, the Rigid Connection generates as many rig-beam kinematical elements as there are nodes on the two surface meshes.
To know more about the generated element, refer to Rigid Spider in the Finite Element Reference Guide.
Open the sample16.CATAnalysis document from the samples directory.
-
Make sure you created a Finite Element Model containing a Static Analysis Case from this assembly.
-
Make sure you know all you need about what type of property you will use for what type of connection.
-
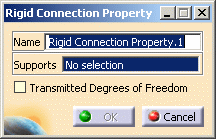
Click Rigid Connection Property
 in the Connection Properties toolbar.
The Rigid Connection Property dialog box appears.
-
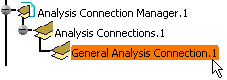
Select an analysis connection.
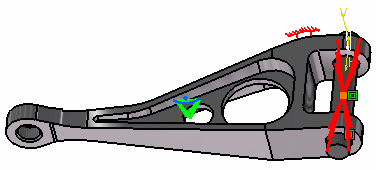
In this particular example, select the General Analysis Connection.1 in the specification tree (under the Analysis Connection Manager.1 set).
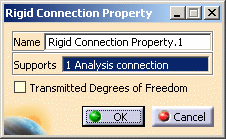
A symbol representing the Rigid Connection Property is visualized on the corresponding faces.
By default, if you deactivate the Transmitted degrees of freedom option, all the degrees of freedom are transmitted.
You can also release some degree of freedom to the distant connection, if needed.
The degrees of freedom are released at the null-length element.Translation 1 = Translation in x
Translation 2 = Translation in y
Translation 3 = Translation in zRotation 1 = Rotation in
x
Rotation 2 = Rotation in y
Rotation 3 = Rotation in z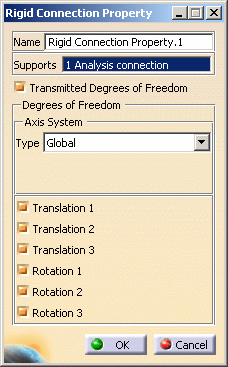
The Axis System Type combo box allows you to choose between Global or User-defined Axis systems for defining the degrees of freedom directions.
-
Global: if you select the Global Axis system, the degree of freedom directions will be interpreted as relative to the fixed global rectangular coordinate system.
-
User: if you select a User Axis system, the degree of freedom directions will be relative to the specified Axis system. Their interpretation will further depend on your Axis System Type choice.
The degrees of freedom are released only for the null-length element, so the User Axis System is defined only for the null-length element.
To select a User-defined Axis system, you must activate an existing Axis by clicking it in the features tree. Its name will then be automatically displayed in the Current Axis field.
If you select the User-defined Axis system, the Local orientation list further allows you to choose between Cartesian and Cylindrical Local Axis Orientations.
-
Cartesian: the degrees of freedom directions are relative to a fixed rectangular coordinate system aligned with the cartesian coordinate directions of the User-defined Axis.
-
Cylindrical: the degrees of freedom directions are relative to a local variable rectangular coordinate system aligned with the cylindrical coordinate directions of each point relative to the User-defined Axis.
-
-
-
If needed, set the Axis system.
-
Click OK in the Rigid Connection Property dialog box.
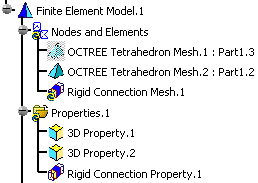
Note that two elements appear in the specification tree:
-
A Rigid Connection Mesh.1 connection mesh part under the Nodes and Elements set
-
A Rigid Connection Property.1 connection property under the Properties.1 set.
-
-
The Finite Element Model contains two Mesh objects, one for each part of the assembly.
-
The sizes of the two meshes are different as can be seen by comparing the Mesh Size symbols.
![]()