 |
When a standard file is modified, there is no automatic
update of the drawings which use this standard. Each drawing contains a
copy of the standard it uses, and retains this version until you explicitly
update this copy or switch the drawing to another
standard. |
 |
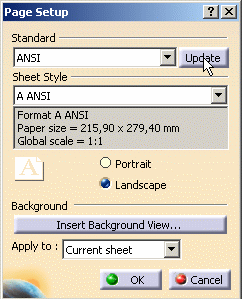
In this task, you will learn how to update the standard
used by a drawing. |
 |
Open any existing CATDrawing file. |
 |
-
Select File > Page Setup from the menu bar.
The Page Setup dialog box opens, displaying the standard currently used
by the drawing.
-
Click the Update button to update the current
standard.
-
Click OK
to close the dialog box.
|
|
|
About the Update of a Standard File
|
|
|
- The most recent version of the updated
standard is copied into the drawing and the
previous standard parameter values are replaced
by the latest ones, reflecting the latest
changes an administrator or user may have
performed in the standard file. This may have an
immediate impact on the appearance of the
elements inside the drawing.
- Styles are not affected by this update, i.e.
styles modified in the updated standard file
will not be re-applied to existing elements.
Indeed, styles are applied when creating
elements (as they define the default values to
be used for creation). If needed, new style
parameters can be re-applied to an element using
the Style toolbar: simply select the
element whose style you want to update and
select the updated style in the Style
toolbar.
|
| |
 |
Since there is no automatic
update of drawings when a standard file is modified, you
need to update the standard of drawings created before
V5 R9 if you want them to benefit from the new
parameters. |
|
|
|
|
|
|
International standards
|
|
|
When they follow international
standards, some dimension values are automatically
updated with the new international standards:
- Dimension's vertical position:
When it follows the international standard, i.e.
0 for ANSI, 0.5 for ISO and 2 for JIS.
- Dimension's orientation reference and
orientation:
When it follows its previous international
standard, i.e. horizontal with screen reference
for ANSI and ASME, parallel with dimension line
reference for ISO and JIS.
- Dimension symbols:
When the chosen symbols are the international
ones, i.e. Open Arrow for ISO and JIS, Filled
Arrow for ANSI and ASME.
Furthermore, if the target international standard is
ANSI or ASME, radius type dimension has its dimension
line representation set to 2 parts. |
|
