Deactivating dimensions, for example, enables you to avoid problems when some dimensions cannot be computed anymore (e.g. when geometry has been deleted).
In this scenario, you will see how to deactivate dimensions, but you can also deactivate texts, balloons, welding symbols and geometrical tolerances.
For more information on using Knowledgeware capabilities, refer to the Knowledge Advisor User's Guide.
-
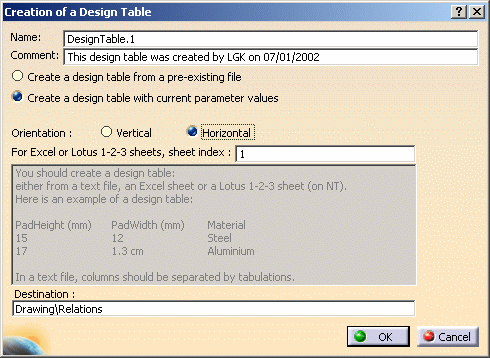
Click the Design Table icon
 in the Knowledge toolbar. The Creation of a Design Table dialog box is
displayed.
in the Knowledge toolbar. The Creation of a Design Table dialog box is
displayed. -
If needed, replace the default name and comment for the design table.
-
Check the Create a design table with current parameter values option.
-
Check the Horizontal orientation option.
-
Click OK. The Select parameters to insert dialog box is displayed.
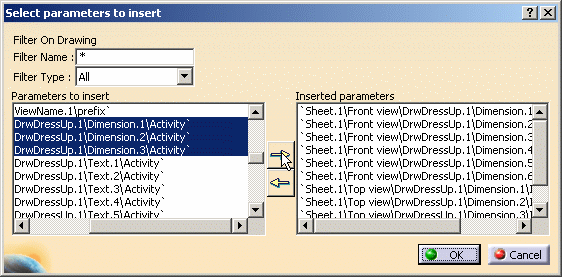
In the Parameters to insert list, you can notice that there are Activity parameters for a number of annotations (dimensions and texts, in this specific case).
-
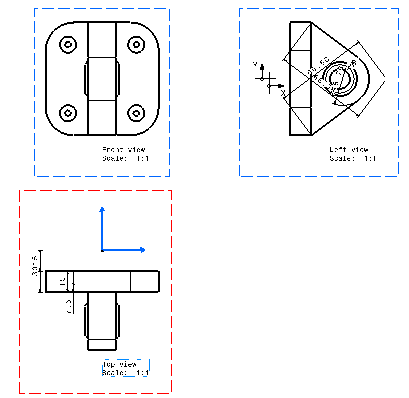
For the purpose of this scenario, select all of the Activity parameters for dimensions: the Sheet.1\Front view\DrwDressUp.1\Dimension.#\Activity, Sheet.1\Top view\DrwDressUp.1\Dimension.#\Activity and Sheet.1\Left view\DrwDressUp.1\Dimension.#\Activity items. Then, click the right arrow to add these items to the Inserted parameters list.
-
Click OK. A Save As dialog box is displayed.
-
Specify a path and filename for the design table to be created. Click OK in the file selection dialog box.
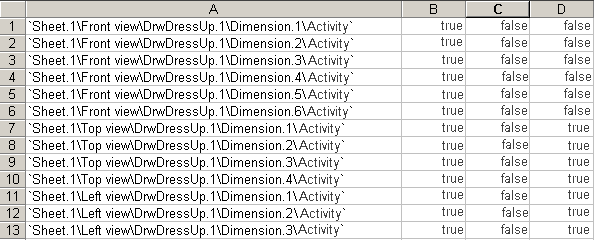
The design table feature is added to the specification tree and a dialog box displays the newly created design table. This design table contains only one configuration, on line 1. By default, all dimensions are active (their Activity parameters are set to "true").
-
Click the Edit table... button to start an Excel application (under Windows) or open the text editor (under Unix).
-
In column C, set each item to "false".
-
In column D, set each Sheet.1\Front view\DrwDressUp.1\Dimension.#\Activity item to "false" and Sheet.1\Top view\DrwDressUp.1\Dimension.#\Activity and Sheet.1\Left view\DrwDressUp.1\Dimension.#\Activity item to "true". This will enable you to deactivate some of the dimensions while keeping other dimensions active.
-
Save your Excel or .txt file and close your application. An information message is displayed to let you know that the design table was updated; click Close. The design table now contains 3 configurations.
-
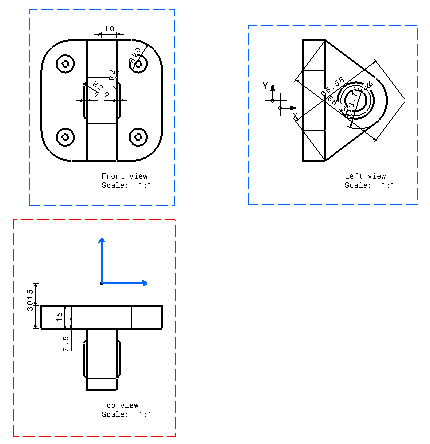
You can now select another configuration in the Design table dialog box. Select line 3, for instance, and click Apply. You can notice that the dimensions in the front view are deactivated, while the dimensions in the other views remain active.
-
Click OK to exit the dialog box and add the design table to the document.
- The only way you can display deactivated annotations is by reactivating them through Knowledgeware (i.e. by setting their Activity parameter to "true").
- You can also deactivate/activate annotations using formulas. For more information about formulas, refer to the Knowledge Advisor User's Guide. You can also see Deactivating Table Rows in this User's Guide for a scenario on using formulas to deactivate rows in a table.
![]()