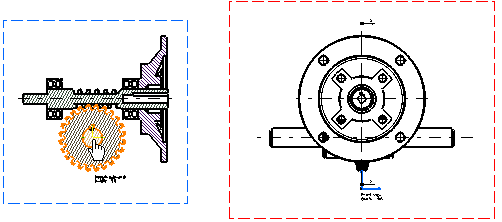
Tile your windows horizontally to view both your drawing and the related part by selecting Window > Tile Horizontally.
Go to Tools > Options > Mechanical Design > Drafting > Generation tab. Select the Filters before generation check box. This automatically launches the dimension generation filters before generating dimensions.
-
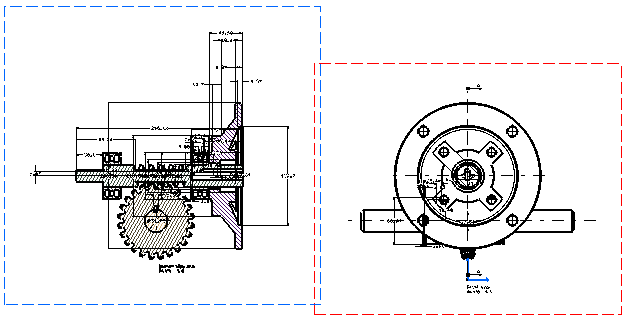
By default, dimensions will be generated on all views. If you want to generate dimensions on a specific view, select this view.
-
Click Generate Dimensions
 in the Generation toolbar.
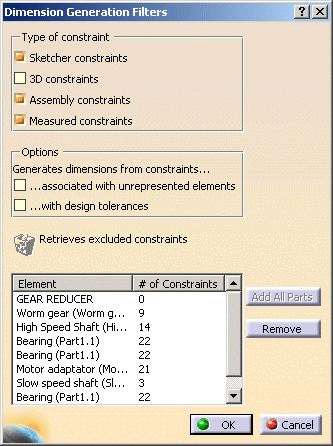
The Dimension Generation Filters dialog box is automatically displayed.

The Dimension Generation Filters dialog box displays the parameters and filters that you can use for dimension generation, lists the elements for which dimensions will be generated, and specifies how many constraints there are for each listed element. Let's describe the dialog box more precisely:
The options in the Type of constraint area let you specify what type of constraints you want to generate dimensions from in your drawing.
-
Sketcher constraints: generates dimensions from constraints created in the Sketcher workbench.
-
3D constraints: generates dimensions from 3D constraints (for instance an Offset between two planes).
-
Assembly constraints: generates dimensions from assembly constraints. This option is active only in the case of products or assemblies.
-
Measured constraints: generates dimensions from measured constraints.
The options in the Options area let you generate additional dimension types.
-
...associated with un-represented elements: generates dimensions from constraints associated with elements that are not represented on the drawing (i.e. which are not visible in the various views your drawing may contain). In this case, the generated dimensions will appear as not attached to any element in the drawing.
-
...with design tolerances: generates dimensions from constraints with design tolerances, and applies the constraint tolerance to the corresponding generated dimension.
The following commands are also available:
-
") Retrieve excluded constraints: retrieves all the constraints
which you previously excluded (either using the Not Generated icon
Retrieve excluded constraints: retrieves all the constraints
which you previously excluded (either using the Not Generated icon
") when performing a step by step generation, or by removing a generated
dimension from the drawing), and re-generates the dimension. This icon
is active only when there are dimensions to retrieve.
when performing a step by step generation, or by removing a generated
dimension from the drawing), and re-generates the dimension. This icon
is active only when there are dimensions to retrieve. -
Add all parts: adds all parts that belong to the selected product or assembly to the list. This button is active only in the case of products or assemblies.
-
Remove: removes the selected element from the list. Dimensions will not be generated for this element.
By default, only the product is displayed in the list of elements for which dimensions will be generated, and only the Assembly constraints and Measured options are active: if you left the dialog box as is, dimensions would only be generated from the product assembly constraints and measured constraints.
-
-
You will now add additional elements to generate dimensions for. You have two possibilities:
-
If you want to generate dimensions for specific elements only: in the drawing, select each element for which you want to generate dimensions. The elements you select are added to the list.
-
If you want to generate dimensions for all elements, click the Add all parts button to add to the list all the parts belonging to the product.
For the purpose of this exercise, click the Add all parts button. All elements are added to the list. You can notice that the Sketcher constraints and 3D constraints options are now active and selected.


When the same part is used several times within a given product (as is the case for Bearing (Part1.1) in this scenario), generations for this part are generated only once, for a single part instance (instead of being generated for all part instances). By default, dimensions are generated on the part instance which is the first in the product specification tree. If you want to generate dimensions on a specific part instance, you need to select this instance. -
-
Clear the 3D constraints check box to specify that dimensions from 3D constraints should not be generated. You can notice that the list is updated with the proper number of constraints for each element.
-
Click OK. The dimensions are generated on the drawing.
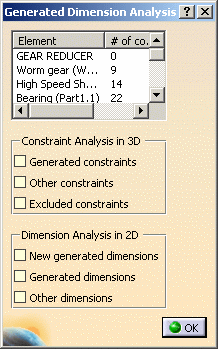
Depending on whether the Analysis after generation option was selected in Tools > Options, the Generated Dimension Analysis dialog box may now appear.
-
Click OK to close the Generated Dimension Analysis dialog box.
![]()