About Merger
This functionality is no longer useful. We recommend you not to use it anymore, because of the reasons described hereafter:
- Performances in clash context, visualization context, in terms of memory consumption are no more significantly improved when using the merger, due to general CATIA V5 improvements.
- Clash status can be modified by the merger computation, leading to wrong results.
Note: If the use of this command is motivated by a merging operation of several models into a single one, we recommend you to use any other DMU Optimizer command providing this capability (for example Simplification) by using multiselection and saving the result in a single file.
- available in interactive mode
- the result of this operation can be saved in cgr, VRML, CATIA V4 mockup Surface. It can be managed as an alternate shape.
Insert the Keypad.cgr document. This cgr file is to be found in in the
online documentation filetree in the DMU Optimizer samples folder
online\dmoug_*X2\samples
 |
Alternate Shape:
(Optional)
You can manage automatically your result as an alternate shape of the
initial component.
For this:
- Select Tools > Options from the menu bar. The Options dialog box is displayed.
- Expand the Digital Mockup category from the left-hand tree.
- Select DMU Optimizer item to display the corresponding tab. The Alternate Shapes Management is available.
- Select the Merger check box: when activated the Merger representation is the one visualized in session.
-
Click
 in the DMU Optimizer
toolbar.
in the DMU Optimizer
toolbar.
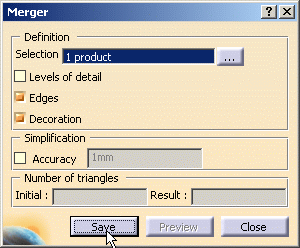
The Merger dialog box is displayed: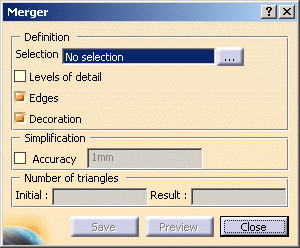
- Edges: this check box is selected by default, the edges are kept.
- Decoration: this check box is selected by default
- Levels of detail: if checked, the calculation takes into account the levels of detail. If the selected product does not include levels of detail, note these will be calculated when launching the command, therefore the cgr size will be larger.

Note: If you manage the Merging operation result as an alternate shape, the Merger dialog box will be slightly different from the above dialog box, click on the image below: 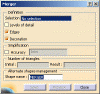
In this case, the resulting merger representation will replace the initial component.

- In our scenario, we decided not to treat the merger representation as an alternate shape
-
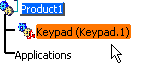
Select the Product you want to be merged either in the geometry area or in the specification tree (i.e. keypad.1)
-
(Optional) Simplify your merger representation:
-
Select the Accuracy check box in the simplification area.
-
Enter a new value if needed.
Note: - The Preview button is grayed out if you do not simplify your representation, because there is no changes in the visualization.
-

-
Click Save.
The save as dialog box is displayed: - Set the Type to .cgr. You can also save your resulting shape in .wrl, .model .stl formats
- Identify the folder in which you want to save the file
- Enter a file name

-
Click Save
-
Reinsert the merger representation (Keypad.1_MERGER.cgr) you just saved in Product1
- Right-click Product1, select Components > Existing Component...
- Select Keypad.1_MERGER.cgr in the File Selection dialog box and click Open
- use the 3D compass manipulation handle to obtain two different
keypads in the geometry area (For more information, see
Moving Objects using the 3D Compass in the Infrastructure
User's Guide)

-
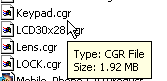
Compare the size of the two cgr documents:
Before merging operation
After merging operation


The cgr is optimized and much lighter. The number of triangles is identical: 
![]()