How associative mode works
By doing a
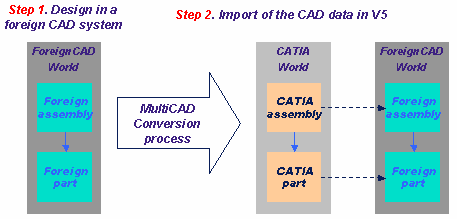
batch conversion over a I-DEAS assembly, this assembly is transferred into
a V5 format file: a CATProduct. All the Parts contained in this I-DEAS
assembly are converted as a cgr or CATPart. During this transcription, we
transfer all the assembly structure, geometrical information as well as
original links.
After this conversion, the CATProduct reproduces the 3D View of the
original assembly and also stores a link onto the original files. The last
information will enable the Multi-CAD Update Batch to check if V5 data are
up to date compared with their original data.
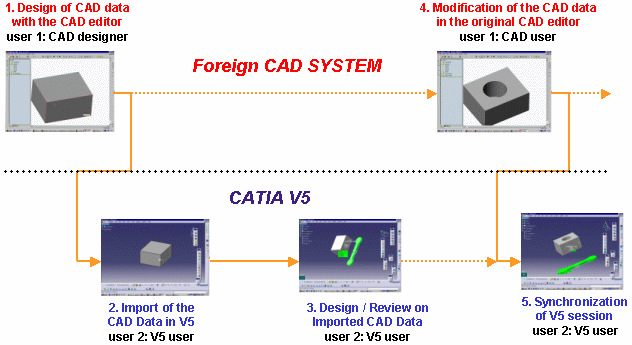
From the Import of CAD data to the Synchronization of V5 Session:

Launching the Update Batch means using the associative
mode; the Batch operates on V5 data in order to update their structure or
geometry according to the changes made by the I-DEAS designer onto the
original data.
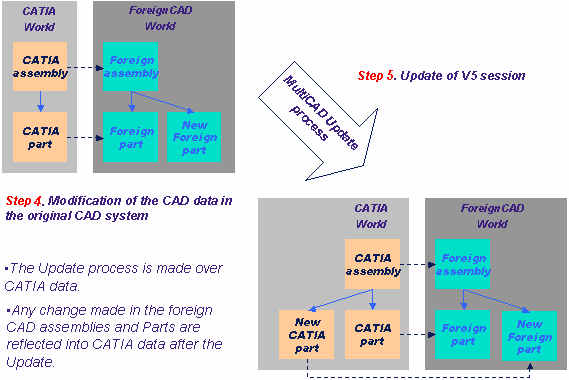
On the one hand, if a I-DEAS part file has been modified, you can launch
the update Batch on the CATProduct and the part file -not the whole
assembly structure- is re-converted so that the V5 geometry of the I-DEAS
part is always up to date. The part can be subsequently manipulated in V5.
On the other hand, if only the I-DEAS assembly structure has been
modified, you can launch the Batch on the CATProduct and the assembly file
-not the part file- is re-converted so that the V5 product structure is
updated.
Multi-CAD Conversion and Update Processes:


Associative mode is useful when a user wants to maintain synchronization with structure and/or geometry changes. But if you prefer to keep your assembly as it was at the moment of the conversion, you do not need to launch the Batch. Therefore, in this case, you will not do any synchronization between V5 data and original I-DEAS data.
How to use the Update Batch for Multi-CAD Data
Note that CATIA.V5R8.B08 is an example, the set of characters will vary according to the level of CATIA installed.
-
On Windows, in a Command Prompt window, you can launch the conversion Batch by entering the following command:
"C:\<install_dir>\intel_a\code\bin\CATDMUUtility.exe" -env CATIA.V5R8.B08 -direnv "C:\Winnt\Profiles\All Users\Application Data\Dassault Systemes\CATEnv" -f E:\tmp\sw.sldasm -product E:\tmp\prod1.CATProduct
For information, "-env..." is the default environment (CATIA V5R8 for instance) and "-direnv..." is the directory path containing this environment.
Please note that this conversion will take into account the settings in Tools -> Options -> General -> Compatibility -> External Formats. -
In the original CAD system, modify a I-DEAS part contained in sw.sldasm.
-
Launch the update Batch by entering the command:
C:\<install_dir>\intel_a\code\bin\CATMCIReplace.exe" -env CATIA.V5R8.B08 -direnv "C:\Winnt\Profiles\All Users\Application Data\Dassault Systemes\CATEnv" -i E:\tmp\prod1.CATProduct -update
If you open prod1.CATProduct interactively in CATIA V5, you will be able to see the geometry modification.