Building a Wall System Part

This task shows you how to build a wall system part.

If you are using this application then you will obviously have a ship design of your own. However, if you do not have one as yet, or you simply want to practice, you can use one that has been included with this application. Click here, then click Open in the dialog box that displays. After the document has opened save it on your file system.

You should Hide any adjoining wall systems before creating a new wall system.

1. With your ship displayed, click the Build Wall System Part button . The Build Wall System dialog box displays.

2. Enter a part name for the wall system, and then click the Intersections button so you can define which surfaces you want to intersect when you build the new wall system.

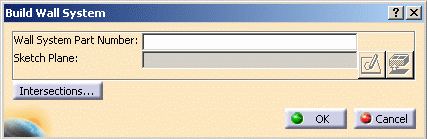
The following dialog box displays:

3. If the ship's hull is not shown, use the Hide/Show command to display it.
  4. Tilt the ship using standard procedures so that the sides of the hull and bulkheads are visible. You will need to select the body of the hull or bulkheads.
  5. Select each surface you want to define your wall system (hull, bulkheads, etc).

As you select each surface, its information appears in the Intersecting Surfaces dialog box:

  6. Click OK when you have finished enclosing the wall system area.

The Build Wall System dialog box reappears.

  7. Select a plane for the sketch.

In most cases you can select the deck of the ship by clicking on it. If you cannot use the deck for some reason, you must create a plane.

After you select the plane, the Sketcher application opens and the ship is displayed in top view. (If you prefer you can turn the ship around by clicking the Normal View button.) Also, the part name appears in the specifications tree.

You can see the intersections you created because they are represented by yellow lines once you enter the Sketcher application:

The wall system must be fully enclosed for this application to recognize it (for compartment creation purposes). In the image above, only the top center portion, which is completely enclosed by yellow lines, will be recognized as a wall system. You can also see how the ship has been tilted slightly to facilitate selecting the body of the hull and bulkheads.

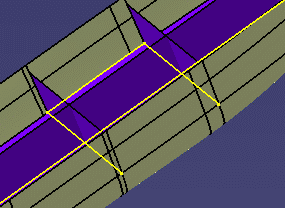
If you want to limit the intersections to the desired area only, then you can use the Relimit command (available in some associated applications) to remove the extra intersection (yellow lines).

8. You can now use one of the Sketcher commands to create the layout of the wall system. If you want a wall to extend all the way to a bulkhead or hull then make sure you select those when you are drawing. In the image below, the Sketcher's Line tool has been used to create simple walls in the system.

NOTE: There are two points at the spot where two sections join. Do not select these points to draw a line from. If you need to draw a line at this exact spot then expand the specifications tree and Hide the points.

9. Exit the Sketcher.

The Build Wall System dialog box displays again.

10. Click OK, and save your wall system.
You can add another sketch to your wall system, or change the layout of an existing sketch, subject to the recommendations made earlier. Also, you should try to limit your wall system to 20 compartments (of any size), as recommended earlier, to minimize the time needed to extract the compartments.

You can specify values to wall geometry, such as thickness and material, that  downstream processes like Structures Piece Part Generator can use. The values you specify have no effect in this application. As of Release 15, only thickness and material attributes can be defined. These are defined in a text file, and the sample file provided with this application is named PlateGenerationOptions.txt, located in the directory ...intel_a\startup\EquipmentAndSystems
\CompartmentAccess\CompartmentAccessDesign\SampleData
.

Do not change the file format. You can change the location, but make sure the location is correctly referenced in the project resource management file. To modify the file, use a text editor like WordPad. The Material value must be recognized by Structures applications. The Thickness value is a number that translates into the current working units - millimeter, inch, etc.