This task shows you how to create a flanged hole by specifying the punch geometrical parameters.
For the Generative Sheetmetal Design workbench,
open the
NEWStamping.CATPart document.
For the Aerospace SheetMetal Design workbench, open the
Aero_Stamping.CATPart document.
-
Click Flanged Hole
 .
. -
Click the surface where you want to place the hole.
A grid is displayed to help you position the flanged hole.

The Flanged Hole Definition dialog box is displayed, providing default values.
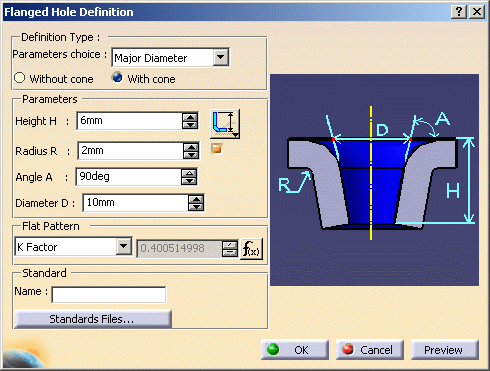
Note that the image in the right-hand pane of the dialog box is updated as you choose your parameters and options, and provides a graphical explanation about the current selection.
Also note that the options available in the dialog box are updated according to the items selected in the Definition Type area.
-
If you want to use a standard, click the Standard File button and browse to select a standard file. In this case, the standard parameters will be used, and you do not need to (and cannot) specify the definition type, flanged hole parameters and/or flat pattern diameter (depending on what exactly is specified in the standard file); go directly to step 8.

- The parameters that are driven by the standard table cannot be modified.
- For more information on standard files, refer to Editing the Sheet and Tool Parameters, and to Customizing Standard Files to Define Design Tables in the Customizing chapter of this user's guide.
For the purpose of this scenario, do not select a standard file, and proceed with step 4.
-
Choose the diameter that should be dimensioned from the Parameters choice list:
-
Major Diameter
-
Minor Diameter
-
Two Diameters (major and minor diameters)
-
Punch & Die
-
-
Specify whether the flanged hole should be created without a cone (i.e. only with the filleted portion of the flanged hole) or with a cone (i.e. with the filleted portion of the flanged hole and with a cone).
Note that selecting the Without cone option has the following consequences:
-
The Height H field is disabled, the height being automatically computed in this case.
-
Deactivating the Radius field is impossible, because the radius value for the flanged hole external curvature must be specified in this case.
-
-
Choose the flanged hole parameters:
-
In the Height H field, specify the height value for the flanged hole. Use the icon next to the field to specify the reference from which the height is defined:
 or
or
 .
. -
In the Radius R field, specify the radius value for the flanged hole external curvature. Use the box next to the field to disable this option.
-
In the Angle A field, specify the angle value for the flanged hole.
This option is not available for the Two Diameters or Punch & Die parameters, as the angle is automatically computed in these cases.
-
In the Diameter D field, specify the major diameter value for the flanged hole.
This option is not available for the Minor Diameter parameter, as the major diameter is automatically computed in this case.
-
In the Diameter d field, specify the minor diameter value for the flanged hole.
This option is not available for the Major Diameter parameter, as the minor diameter is automatically computed in this case.
-
-
Choose the flat pattern diameter:
-
K factor: uses the K Factor to compute the flat pattern diameter.
-
Flat diameter: lets you set your own flat pattern diameter. If you select this option, you must enter a value in the associated field.
- Make sure that the flat pattern diameter does not exceed the flanged hole external contour. Otherwise, it will be impossible to create the flanged hole.
- Flanged holes that were created prior to R16, without the flat pattern diameter specified, do not inherit from this functionality. In this case, to specify the flat pattern diameter, you need to delete and create the flanged hole again.
- If you want to be able to perform any operation (like a cutout) on a flanged hole, you need to use the K factor option.
-
-
Click Preview to visualize the flanged hole.
-
Click OK to validate.
-
The flanged hole (identified as Flanged Hole.xxx) is created and the specification tree is updated accordingly.
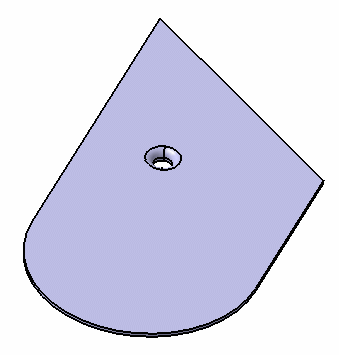
Flanged hole viewed from the front
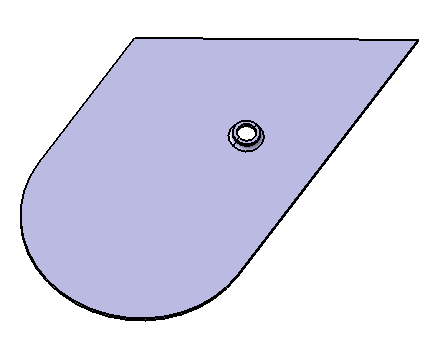
Flanged hole viewed from the back
![]()