 |
This task shows
you how to build a small assembly. This is usually done by an
administrator. Main steps are:
- Defining input geometry
- Sketching the contour in a positioned
sketch
- Creating the small assembly
- Creating an assembly template.
Small assemblies are
document templates. Templates created reference the shapes and plates
making up the assembly. |
 |
A PKT license is required to build user
defined features. |
 |
1. |
Open the document containing the plates and
shapes that will assist you build the small assembly. 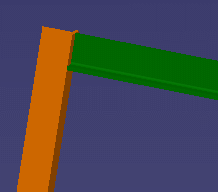
|
|
|
2. |
Set the Keep link with selected object option. (Tools
- Options - Infrastructure - Part Infrastructure - General). |
|
|
Defining Input
Geometry
|
|
|
3. |
Insert a new product (Insert - New
Product), and rename it, for example Assembly Template. |
 |
|
Assembly templates must be created at
product level. |
|
4. |
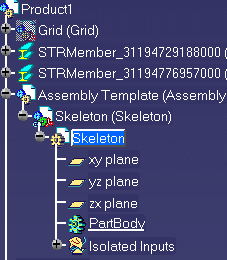
Insert a new part under the new product
(Insert - New Part), and rename it, for example, Skeleton.
This part will contain input geometry, i.e. imported plate and shape
surfaces or edges. |
|
5. |
Import the plate and shape surfaces or edges
you will need:
- Switch to the Wireframe and Surface workbench (Start ->
Mechanical Design -> Wireframe and Surface Design).
- Using the Intersection command
 ,
create the intersection geometry between planes of the new part and
surfaces/edges of the plates and shapes and/or reference planes. ,
create the intersection geometry between planes of the new part and
surfaces/edges of the plates and shapes and/or reference planes.
Surfaces/edges are imported under an External References entry in the
specification tree.
|
|
|
- When done, delete the geometrical set containing the intersect
entries.
|
|
|
- Rename imported surfaces/edges as follows:
Plate surfaces/edges: Platen_(name of the published plate surface or
edge)
Shape surfaces/edges: Shapen_(name of the published shape surface or
edge)
where n is a number identifying the number of parts to be selected by
the user when instantiating the assembly template.
For example, Plate1_Face_Standard, Shape1_Face_MoldedFlange1
|
|
|
- Isolate imported surfaces/edges and rename the Isolated External
References entry, for example, Isolated Inputs.
This breaks the link between imported surfaces/edges and referenced
shapes.
|
 |
|
|
|
Do not use input geometry in knowledgeware
rules or formulas [F(x)]. If you need to do so, duplicate the geometry
using Offset
 or Extract
 commands and reference the duplicated geometry in the rule or formula.
Note: The user feature creating
stable geometry uses rules and formula. |
|
6. |
Hide the axis system planes and click to
clear the Pickable checkbox in the Graphic tab of the Properties dialog
box making them unselectable.
You must not use these planes when creating construction geometry. |
|
|
Sketching the
Contour in a Positioned Sketch
Using a positioned sketch lets you explicitly define the position of
the absolute axis of the sketch. To create a positioned sketch, you must
specify a reference plane, an origin and the orientation of the absolute
axis.
The new body inserted below will contain the geometry needed to define
a positioned sketch as well as the small assembly contour. |
|
7. |
Insert a new body (Insert ->
Geometrical Set), and rename it, for
example, Construction Geometry. |
|
|
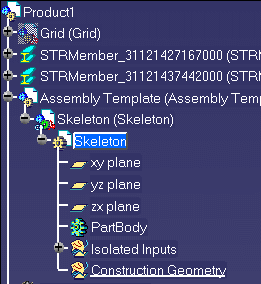 |
|
8. |
Use the Intersection command
to create two construction lines between the imported surfaces. |
 |
|
Since the
orientation of intersect lines is not known, you will now create stable
geometry from them. This is done by instantiating a user feature supplied
with the product.
Stable lines are lines whose orientation is known and whose
orientation will be kept when the small assembly template is
instantiated. |
|
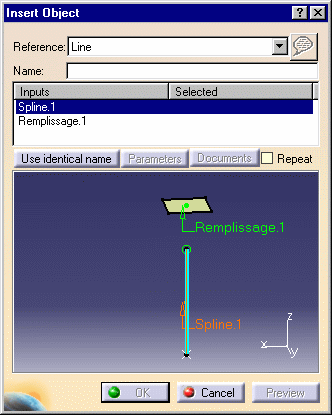
9. |
Create stable construction geometry:
- Select Insert -> Instantiate from Document... from the
menubar to instantiate the user feature OrientedCurve.CATPart located in folder ..\OS\startup\EquipmentAndSystems\Structure\DetailingFeatures\UtilityUDFs
|
|
|
OrientedCurve.CATPart has two
inputs and one parameter:
- a curve or line (can be an intersect)
- a reference surface
- a parameter determining whether or not the starting point of the
line is the nearest element to the reference surface.
|
|
|
The Insert Object dialog box
opens.
- Select one of the wireframe lines just created then select a
reference surface. The reference surface must be
an offset or an extract of the imported external reference.
- If necessary, click Parameters in the Insert Object dialog box to
define the starting point of the stable line.
By default, the starting point is the point nearest the reference
surface.
- Click Preview to visualize the stable line.
The user feature generates a line (in bold blue) oriented as defined by
the parameter and two points, one at each end of the line. The start
point is represented by a green circle and the end point by a white
cross.
- Check Repeat in the dialog box then click OK when done.
The user feature is automatically re-instantiated when the Repeat
option is checked.
- Repeat to create other stable line.
Do not forget to uncheck the Repeat option before clicking OK.
|
 |
|
|
- Create a plane from the two stable lines.
Note: Any of the points created by the user feature can be used to
specify the origin of the sketch.
|
|
10. |
Use the Sketch
with Absolute Axis definition
 command to correctly position the small assembly you will sketch.
The Sketch Positioning dialog box opens. |
|
|
- Keep Type set to Positioned.
- Select the plane created above as the reference plane for the
sketch support.
- Define the sketch origin as follows: Set Type to Projection point
then select one of the points created above.
- Define sketch orientation as follows: Set Type to Parallel to line
then select one of the two lines defined above.
- Use dialog box options to orient the H,V axis system correctly.
- Click OK.
The Sketcher workbench opens.
|
|
11. |
Sketch the small
assembly and constrain sketch elements. |
 |
|
- Do not apply vertical or horizontal constraints.
- Constrain the sketch to stable construction geometry.
- A green sketch means your contour has been properly constrained.
- You are advised to change values of parameters that the user will
be required to enter to ensure that the small assembly behaves
correctly.
|
|
|
 |
|
12. |
Create as many
sketches as plate and shapes making up the assembly. |
|
|
13. |
Publish construction geometry
you will use to create your shapes and plates:
- Switch to the Part Design workbench (Start -> Mechanical
Design -> Part Design)
- Select Tools -> Publication.
|
 |
|
14. |
Check the Only use
published elements for external selection keeping link option in the
Options dialog box (Tools -> Options -> Infrastructure -> Part
Infrastructure -> General).
This will ensure that you select only published geometry when creating
plates and shapes. |
|
|
Creating the Small
Assembly
|
|
15. |
Switch to your
structure workbench and use Shape
 and Plate
 commands to create the shapes and plates making up your assembly based on
published construction geometry.
commands to create the shapes and plates making up your assembly based on
published construction geometry.
For a plate, use the Support and contour mode, selecting the plane
created as support. |
|
16. |
Save your
document. |
|
17. |
Load the Assembly
Template CATProduct only. |
|
|
|
The template
document must be standalone, i.e. it contains all that is needed for the
assembly template. It must not contain external links. |
|
|
You are now ready
to build your template. |
|
|
Creating an Assembly
Template
|
|
18. |
Select Insert
-> Document Template Creation... The Document Template Definition
dialog box opens, listing CATParts in the document. |
|
|
|
- Any documents referenced must have New document Action status.
- Click the Inputs tab and then select isolated surfaces/edges.
- Enter roles for these surfaces/edges using the following naming
conventions:
SHAPEn _(name of published shape surface or edge)
where n is a number identifying the number of parts to be selected by
the user when instantiating
PLATEn_(name of published plate surface or edge)
where n is a number identifying the number of parts to be selected by
the user when instantiating
For example,
SHAPE1_Edge_MoldedFlange2
PLATE1_Face_Standard
The assembly template is created under a Knowledge Templates entry
in the specification tree.
|
|
|
 |
|
19. |
Save the document. |
|
20. |
Store the assembly
template in the sample catalog. |
|
 |