- ATOMIZER
- BODY1
- BODY2
- LOCK
- REGULATOR
- TRIGGER
- VALVE
- REGULATION_COMMAND
-
Click the Enhanced Scene icon
 and create an Enhanced Scene.
You are now in a scene window.
The background color has turned to green and Scene.1 is added in the specification tree.
-
Click the Exit Scene icon
 to swap to the main window.
You return to Assembly context.
Adding Components in the Assembly
In Overload Mode Partial, the behavior will be as described below.
-
Right-click Product1 in the specification tree and select Components -> Existing Component.
-
Shift-select NOZZLE1.model and NOZZLE2.model and then click Open.
The added components (NOZZLE_1 _2 and NOZZLE_1_2) are identified in the specification tree and added in the geometry area.
-
In the specification tree, double-click Scene.1 to swap to the Enhanced Scene context.
The newly-added components will appear in the specification tree and in the geometry area, assuming that, when they were added in the Assembly, they were added under the node that was selected for the creation of the Enhanced Scene. Otherwise, they will not appear.
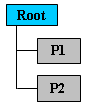
For example, given the following Assembly configuration,
if you created an Enhanced Scene that contained only product P1 and you add a product under product P1 in the Assembly, then the added product will appear under P1 in the Enhanced Scene. However, if you add a product under the Root in the Assembly, it will not appear in the Enhanced Scene.
-
Click the Exit Scene icon
to return to Assembly context.
Replacing Components in the Assembly
-
Replace, for example, the BODY1 in the Assembly with the BODY2.model (right-click BODY1 in the specification tree, select Components -> Replace Component from the contextual menu, then, in the File Selection dialog box, select BODY2.model and click Open.)
The Assembly is updated accordingly.
-
Double-click Scene.1 in the specification tree to enter the scene.
Scene.1 has been updated in the same manner as the Assembly, assuming that Scene.1 is in Overload Mode Partial and that the replaced component was previously defined in the Enhanced Scene.
-
Click the Exit Scene icon
to return to Assembly context.
Deleting Components from the Assembly
-
Delete, for example, the BODY2 from the Assembly (right-click it in the specification tree and select Delete from the contextual menu.)
The Assembly is updated accordingly.
-
Double-click Scene.1 to enter the Enhanced Scene.
Scene.1 has been updated in the same manner as the Assembly, assuming that the deleted product was previously visible in the Enhanced Scene.
![]()