The cloud of points you import in Digitized Shape Editor may be noisy,
for various reasons,
mainly because of a poor digitalization accuracy on the edges of parts.
This noise is found again on the meshes computed from these clouds of points
or imported
in STL format.
The consequences are:
- very noisy scans produced with the Planar Sections or Segmentations actions or
- the reconstruction of wavy curves or surfaces and/or of very high order.
This can be partly avoided by smoothing the mesh.
- This action cannot be used on meshes with non-manifold edges.
- Since the volume of the part is reduced, some small facets may be
inverted by the meshing.
Therefore we recommend you alternate Mesh Smoothing and Flip Edges actions. - Use the Activate function to process only a portion of a cloud.
-
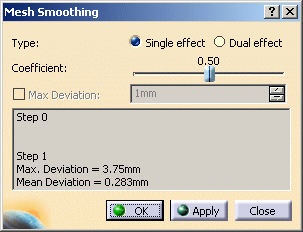
Click Mesh Smoothing
 and select a mesh.
 -
The Mesh Smoothing dialog box is displayed.

-
Select the type of smoothing:
- Single effect if there is no sharp edge on the mesh to process.
- Small radii will be erased.
- The volume of the part will be reduced (contraction towards the center of gravity of the part).
- Dual effect to reduce the distance between outliers and the surface,
and reduce the erasing of small radii.
- The reduction of the volume of the part is smaller.
- A large displacement of one vertex inwards may cause the neighboring vertices to move outwards.
-
Two other controls are available:
- Coefficient: It balances the effect of the new theoretical position in comparison
with the original position.
It varies from 0 (the vertex is not moved) to 1 (the vertex is moved to the computed position).- Max Deviation: Select this check box to control the maximum deviation allowed
(the displacement will remain under the value set.)
- The deviation is the distance between a vertex and its initial position
(not between its current position and that of the previous iteration).- Therefore, if you want to control the maximum deviation, you have to check the
Max Deviation option before the first Apply (it is no longer available after the first Apply).
- For a better appreciation of the quality of the intermediate meshes, the meshes are
displayed in Flat Shading within the action.
- In addition, for each step the maximum and the mean deviations
(distances between a vertex and its initial position) are displayed in the dialog box.
-
Click Apply: a new mesh is computed.
This action is an iterative one: click Apply again to smooth the proposed mesh. -
Click OK once you are satisfied.
A Smoothing.x element is created in the specification tree,
the original mesh is sent to the No Show.
Examples:
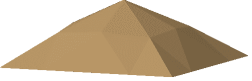
Original part, before entering the action, i.e. in Smooth Shading:
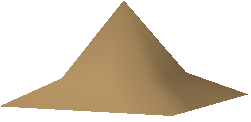
Original part as you enter the action, i.e. in Flat Shading:
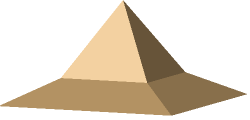
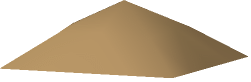
Single effect, in Smooth Shading (after exiting the action)

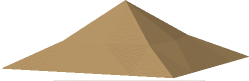
Dual effect, in Flat Shading
Dual effect, in Smooth Shading (after exiting the action)
![]()