This section explains how to change the different sheet metal parameters needed to create your first feature.
-
Click Sheet Metal Parameters
 .
.
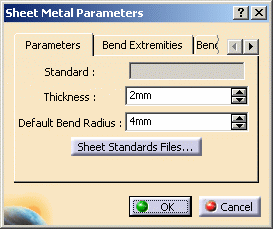
The Sheet Metal Parameters dialog box is displayed.
-
Change the Thickness if needed.
This option is only relevant with the Generative Sheetmetal Design workbench.
-
Change the Default Bend Radius if needed.
The Default Bend Radius corresponds to the internal radius and is linked by default to the creation of the bends.
It can vary from 0deg to 180deg exclusive. This angle is constant and the bend axis is rectilinear.
This option is only relevant with the Generative Sheetmetal Design workbench.
-
Click OK to validate the Sheet Metal Parameters.
The Standard field displays the Standard to use with the part, if implemented. The name of this standard file is defined in a Design Table.
Parameters can be defined in a Design Table. To do so, press the Sheet Standards Files... button to access to the company-defined standards, if need be. For more information, refer to the Customizing Standard Files section.
| Sheet Metal Parameters | Column associated in the Design Table | Definition |
| Standard in Sheet Metal Parameters | SheetMetalStandard | sheet reference name |
| Thickness | Thickness | sheet thickness |
| Minimum Bend Radius | MinimumBendRadius | minimum bend radius |
| Default Bend Radius | DefaultBendRadius | default bend radius |
| K Factor | KFactor | neutral fiber position |
| Radius Table | RadiusTable | path to the file with all available radii |
| Standard Names For Holes | Column associated in the Design Table | Definition |
| Clearance Hole | ClearanceHoleStd | path to the Clearance Hole Standard file |
| Index Hole | IndexHoleStd | path to the Index Hole Standard file |
| Manufacturing Hole | ManufacturingHoleStd | path to the Manufacturing Hole Standard file |
| Fastener Hole | FastenerHoleStd | path to the Fastener Hole Standard file |
| Standard Names For Stamps | Column associated in the Design Table | Definition |
| Flanged Hole | ExtrudedHoleStd | path to the Flanged Hole Standard file |
| Bead | BeadStd | path to the Bead Standard file |
| Circular Stamp | CircularStampStd | path to the Circular Stamp Standard file |
| Surface Stamp | SurfaceStampStd | path to the Surface Stamp Standard file |
| Flanged CutOut | FlangedCutoutStd | path to the Flanged CutOut Standard file |
| Curve Stamp | CurveStampStd | path to the Curve Stamp Standard file |
1. Here is an example for the use of a bend allowance table:

This table defines available all bend radii for a thickness of 2 mm. A design table will be created on the Default Bend Radius of the Sheet Metal Parameters and on the Radius of each bend.
Whenever a bend is created, a radius table will be associated. If the configuration "Bend Radius = 1mm" is selected, a new design table (the Bend Table) will be created from BendTableT2R1.xls in order to compute the bend allowance.
According to the open angle, the bend deduction will be read in the Allowance column or interpolated if necessary.
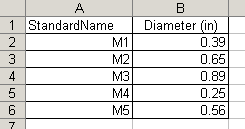
2. Here is an example for the use of a hole standard file:

Whenever a hole is created, a design table will associate its radius with a standard name.
3. Here is an example for the use of a stamp standard file:

- Surface Stamp

- Curve Stamp

- Circular Stamp

- Bead

- Bridge

- Flanged Cutout

- Extruded Hole
(or Flanged Hole in the Generative Sheetmetal Design workbench)

- Stiffening Rib

![]()


