-
To display the Grid in the Sketcher session, just click Grid
 in the Sketch
tools toolbar.
in the Sketch
tools toolbar.

The grid is displayed. In case the grid spacing and graduations do not satisfy you, you can modify them in the Options dialog box as follows: -
Select Tools > Options...
The Options dialog box opens. -
Select the Mechanical Design category in the left-hand box.
-
Select the Sketcher sub-category.
The Sketcher tab that appears lets you set different options.

-
Set the options according to your needs:
- Display: Defines whether the grid is displayed. By default, this option is selected.
- Snap to point: Defines whether annotations are snapped to the grid point. By default, this option is selected.
- Allow Distortions: Defines whether grid spacing and graduations are the same horizontally and vertically. By default, this option is not selected.
Working with the Snap to Point Option
If activated, Snap to Point
![]() available in the Sketch
tools toolbar,
makes your sketch begin or end on the points of the grid. As you are
sketching, the points are snapped to the intersection points of the
grid. Note that this option is also available in the Tools > Options,
Mechanical Design > Sketcher option at the left of the dialog box (Sketcher
tab).
available in the Sketch
tools toolbar,
makes your sketch begin or end on the points of the grid. As you are
sketching, the points are snapped to the intersection points of the
grid. Note that this option is also available in the Tools > Options,
Mechanical Design > Sketcher option at the left of the dialog box (Sketcher
tab).
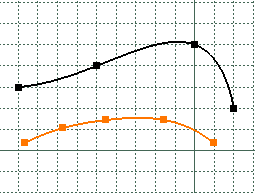
In the following example:
- the black spline was created with Snap to Point on. The points are on the grid.
- Conversely, the highlighted spline was created with the Snap to
Point option deactivated.
![]()