|
Reordering applicative data enables you to
manually reorder applicative data entities under their respective
application node in the specification tree.
Applicative data reordering is applicable to the following types of
applicative data:
- Annotated Views
- Hyperlinks
- Cameras
- Groups
- Lights
- 3D Annotations
- Scenes
- DMU Reviews
|
 |
You can now select a multiple number of
entities to be displaced, thus enabling you to reorder your applicative
data more efficiently. Note that all multi-selected entities must be
contiguous.
|
| |
Scripts for applicative data reordering can be
written using VBScript.
|
 |
Insert the following cgr files:
BODY_1_2.cgr
BODY_2_2.cgr
|
 |
-
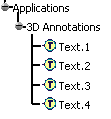
Create four 3D Annotations.
-
Expand the Applications node in the
specification tree.
The four annotations are represented as follows:
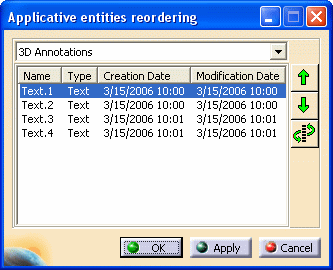
-
Either select the 3D Annotations category in
the specification tree or any one of the annotations (e.g. Text.1)
and click the Applicative Entities Reordering icon

or
click the Applicative Entities Reordering
icon
and select the 3D Annotations category in the specification tree or
any one of the annotations.
The Graph Tree Reordering dialog box appears.
|
| |
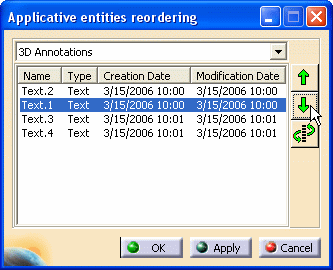
-
To move the Text.1 entity down in the list,
press the down arrow
 . .
The Text.1 entity is swapped with the
entity that was below it, Text.2.
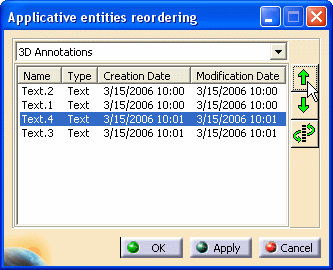
-
To move the Text.4 entity up in the list,
select the Text.4 entity and press the up arrow
 . .
The Text.4 entity is swapped with the
entity that was above it, Text.3.
|
| |
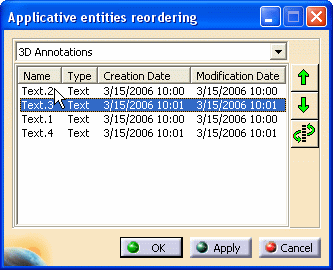
-
To move the Text.3 entity to an arbitrary
place in the list, select the Text.3 entity, press the
displace arrow
 and click on the entity under which the Text.3 entity will now
appear (e.g. Text.2).
and click on the entity under which the Text.3 entity will now
appear (e.g. Text.2).
The Text.3 entity is placed under the
Text.2 entity and all the entities that will be below it
are moved down one position.
-
To save the modifications you have made to the ordering
of the entities, click the Apply button.
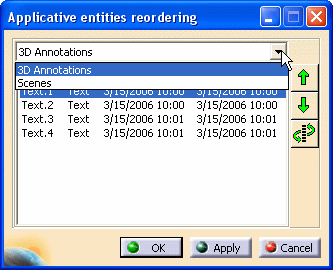
-
To change the applicative data category, click the
selection button and choose the desired category from the list.
|
 |
Note that you must have saved any modifications made to the ordering
as in step 7 before you change categories, otherwise you will lose your
modifications.
|
|
-
To exit the dialog box without saving the modifications
you have made to the ordering of the entities, click the Cancel
button.
-
To save the modifications you have made to the ordering
of the entities and exit the dialog box, click the OK button.
|
|

|