 |
-
Click Offset
 to perform an offset of the Extrude.2 surface.
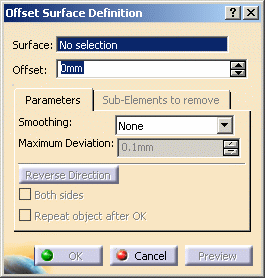
| The Offset Surface Definition dialog box appears. |
 |
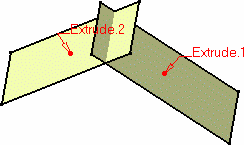
When you want to select the Extrude.2 as the Surface
to offset, you notice that the root surface is not visible in the 3D
geometry as it is in no show.
In order to retrieve this surface, you can use the Quick Select
shared capability. |
-
Click Quick Select
 . .
-
Move the pointer over the geometry.
| Just like in the regular selection mode, the element is
highlighted in the geometry area, and the object name is highlighted
in the specification tree. Moreover, the identity of the pre-selected
element is displayed in the status bar: |
 |
-
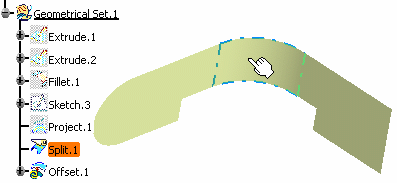
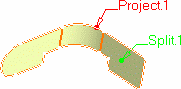
Click the element (Split.1).
|
Information is displayed on the whole geometry:
-
in
green: the feature selected using
the standard selection tool
-
in
red: its direct parents
-
in
purple: the "generating"
element, that is the feature generating the underlying
surface/curve where you initially selected the element.
|
 |
If you display the element's graph using Show Historical
Graph
 ,
you can better relate the elements to its "parents: ,
you can better relate the elements to its "parents: |
 |
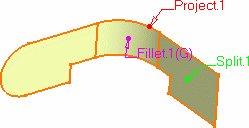
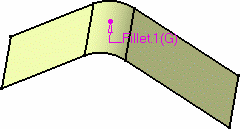
- The Split.1 is the last generated element, to the
left of the graph, and is displayed in green.
- The Project.1 is its direct parent, as shown in the graph and
is displayed in red.
- The Fillet.1 is another direct parent, but is also the
generating one, as it is the first element that unites other
independent elements (the extruded surfaces) that lead to the
creation of the split. Therefore it is displayed in purple, the
precedence being given to the generating element over the direct
parent.
|
| Along with the information onto the geometry, the Quick Select
dialog box is displayed: it indicates which element has been
selected, as well as its parents, and children where applicable. |
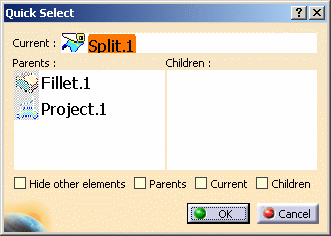 |
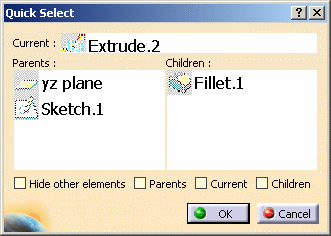
| Within the dialog box, navigate in the Parents / Children graph
in order to retrieve the root surface: select the Fillet.1 element as
Quick Select, then the Extrude.2 element. The latter is set as the
current element. |
| The Quick Select dialog box is updated accordingly: |
 |
| The contextual menu is available on the current element,
displaying standard commands such as Reframe On, Delete, Replace,
etc. |
-
Use the check buttons at the bottom of the dialog box to display or hide a number of elements in the geometry.
- If you check Hide other elements and Parents
, you see this:
|
 |
- If you check Hide other elements and Current
(i.e. the only filleted surface), you see this:
|
 |
- If you Children only (i.e. the projection and the
split), you see this:
|
 |
-
Click OK in the dialog box.
The Quick Select dialog box closes and you return to the Offset
Surface Definition dialog box.
The Surface field is valuated with the Fillet.1 surface
you previously selected. |
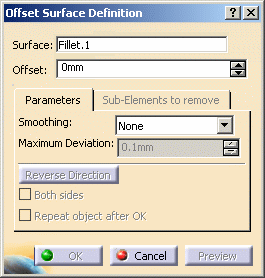 |
-
Specify the Offset.
-
Click OK to create the offset surface.
 |
- You can double-click on any arrow, not necessarily the
generating parent as shown above, to edit any of the elements.
- You can also edit any of the elements by using the contextual
menu available on all elements from the Quick Select dialog box, as
well as from the texts in the geometry.
- You can select another "final" element directly in the
geometry, without having to reselect the Quick Select
icon
.
- Click in space to deselect any geometry and reset the quick
selection without deselecting the icon.
|
|
