Create a Board From Scratch

This task explains how to create a board and design its geometry.
ainfo.gif (980 bytes) The Circuit Board Design functions are available when you are in the Part Design environment.
Several functions are integrated from the Part Design workbench.
aprereq.gif (1223 bytes) Choose the Circuit Board Design workbench. A new CATPart document opens.
  1. Select Create Board I_Board.gif (404 bytes).
    It creates the board behavior.

  2. Select Sketcher I_SketcherP2.gif (229 bytes).

  3. Select the xy plane.
    The Sketcher workbench is launched.

  4. Click Profile I_ContourP2.gif (211 bytes).

  5. Sketch the contour of the Board.

    The profile looks like this:
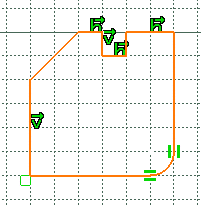
  6. Quit the Sketcher using Exit I_CloseP2.gif (214 bytes):
    You are back in the Circuit Board Design workbench .

  7. Click Pad I_PadP2.gif (218 bytes).

    The Pad Definition dialog box appears.
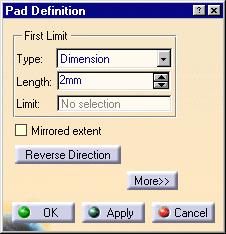
  8. Enter 2mm in the Length field.

  9. Click OK.

    The pad turns green, this means the board representation has been created.
    The board has been created from the active part: Part1.

By default, CATIA recognizes the first pad created as the Board.

ainfo.gif (980 bytes) For more information about the Sketcher, refer to the CATIA V5 - Sketcher User's Guide.