For workbench-specific information, you have to refer to the corresponding workbench documentation.
The Tools Palette is a toolbar containing a set of contextual
tools (e.g. options or boxes) dedicated to the command you activate.
Therefore, the look and content of the Tools Palette vary
according to the workbench in which you are working and according to the
command you are using.
In addition to that, note that not all the commands display a Tools
Palette.
Whatever the workbench, the name of this toolbar is always the same, i.e. Tools Palette.
-
In the Drafting workbench, when you click Dimensions
 in the Dimensioning toolbar, the following Tools Palette
is displayed:
in the Dimensioning toolbar, the following Tools Palette
is displayed:
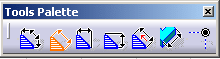
- Still in the Drafting workbench, when clicking Line
 in the Geometry Creation toolbar, the Tools Palette
looks like this:
in the Geometry Creation toolbar, the Tools Palette
looks like this:

In the above example, you can see that the Tools Palette contains a tool,
, as well as two boxes, L (for Length) and A (for Angle).
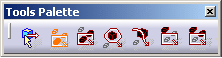
- Now if you access the Imagine & Shape workbench then click
Sphere
 in the Creation toolbar, the following Tools Palette
is displayed:
in the Creation toolbar, the following Tools Palette
is displayed:

About Multi-Selection
For detailed information on these commands, refer to Selecting Using the Selection Traps.
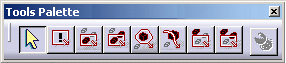
The Tools Palette might also look like this:

- The
 icon lets you preselect and select objects using the pointer. Refer to
Preselecting and Selecting Using the Pointer
for more information.
icon lets you preselect and select objects using the pointer. Refer to
Preselecting and Selecting Using the Pointer
for more information. - The seven icons that follow let you select objects using the selection
traps.
For detailed information on these commands, refer to Selecting Using the Selection Traps.
- Control mode
 lets you activate the advanced selection mode. In this mode, you can select
multiple elements by pressing Ctrl in multiple steps. By
"multiple steps", we mean that you can select several object, release
Ctrl then press it again to add objects to your first
selection. Inversely, you can remove an element from the selection by
selecting it then press Ctrl.
lets you activate the advanced selection mode. In this mode, you can select
multiple elements by pressing Ctrl in multiple steps. By
"multiple steps", we mean that you can select several object, release
Ctrl then press it again to add objects to your first
selection. Inversely, you can remove an element from the selection by
selecting it then press Ctrl.
As this selection mode is controlled, you can choose when you want the selection to stop, contrary to the selection traps that are "single action-oriented", i.e. objects are selected in one go.
When you start selecting objects, the name of the first object you select is displayed in the toolbar:

Then, when at least two elements are selected, List of selected items
is activated and the number of selected elements is displayed instead of the element's name (this icon is grayed out when only one element is selected since it is not relevant):

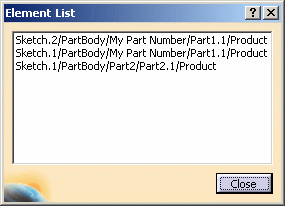
- List of selected items
opens the Element List dialog box that lists the elements you
selected along with their path:
- Finish
 lets
you stop the selection when you are done: all the elements you selected
so far are taken into account. As long as you do not click this icon, you
can keep on selecting objects and add them to your selection list.
lets
you stop the selection when you are done: all the elements you selected
so far are taken into account. As long as you do not click this icon, you
can keep on selecting objects and add them to your selection list.
- If only List of selected items and Finish are displayed:

This means that the advanced selection mode is automatically activated and you can start selecting objects using the Ctrl key.
- If only Finish is displayed:
This means that the advanced selection mode is automatically activated and that you cannot have any feedback on the elements you select.
![]()