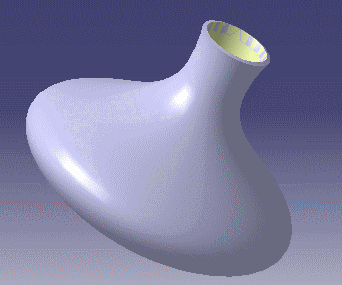
The bottle to be designed will be a five point spline rotated around an axis, and thickened. Once it is created, the spline is rotated, the open end corresponding to the bottom of the bottle is closed and the resulting shape is thickened.
Create a new part.
In the Part Design workbench, access the Sketcher by clicking
the Sketcher icon (![]() ).
).
Click the Spline icon (![]() )
to draw a five point spline looking something like the curve below.
)
to draw a five point spline looking something like the curve below.
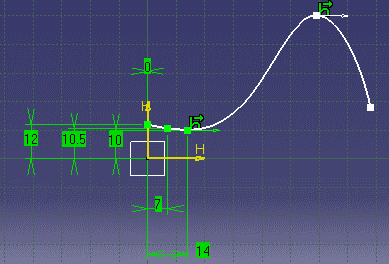 |
Specify the constraints given in the table below.
| Location on spline | Offset along H | Offset along V | Tangency constraint | |
| Control point A | Extremity on the neck | xA = 0mm | yA = 12 mm | none specified |
| Control point B | Next to A on the neck | xB = 7mm | yB = 10.5mm | none specified |
| Control point C | Next to B on the neck | xC = 14mm | yC = 10 mm | horizontal |
| Control point D | Next to C | none specified | none specified | horizontal |
| Control point E | Other extremity | none specified | none specified | none specified |
Use the Constraint icon (![]() )
to specify offset constraints on the three control points making up the
bottle neck.
)
to specify offset constraints on the three control points making up the
bottle neck.
Use the Edit Multi Constraint icon (![]() )
to specify an horizontal tangency on points C and D.
)
to specify an horizontal tangency on points C and D.
At this stage, don't specify any offset on point D and E otherwise you won't be able to modify the bottle profile. But if you wish to start from a spline similar to the one below, you can set the D coordinates to 59 mm (along H) and 50 mm (along V) and the E coordinates to 77 mm and 17mm.
Click the Formula icon (![]() )
to access the formulas dialog box, then modify the offset names according to
the names given in the table above.
)
to access the formulas dialog box, then modify the offset names according to
the names given in the table above.
The resulting document is KwrInitialSketch.CATPart
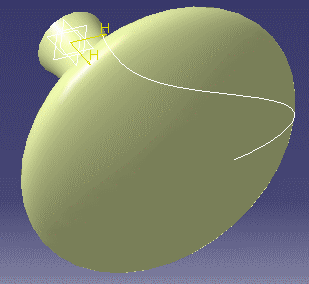
Access the Generative Shape Design workbench and click the
Revolve icon (![]() )
to rotate the spline created above around the H axis. Do a complete
rotation (0deg - 360deg). The generated surface is opened a both ends. This
is what your revolution surface looks like from the bottom.
)
to rotate the spline created above around the H axis. Do a complete
rotation (0deg - 360deg). The generated surface is opened a both ends. This
is what your revolution surface looks like from the bottom.
 |
Access the Generative Shape Design workbench and click the
Fill icon (
![]() )
to close the bottle lower part. This is now what you should get
onscreen.
)
to close the bottle lower part. This is now what you should get
onscreen.
 |
Use the Join icon (![]() )
to join the Revolute and Fill type features.
)
to join the Revolute and Fill type features.
Access the Part Design workbench and click the Thick
Surface icon (![]() )
to thicken the joined surface. Specify a 1.5 mm as First Offset and 0 mm as
Second Offset. This thickness should be an external thickness. The arrows
displayed on screen when you apply the offset values should be directed
toward the outside of the bottle (see the figure below).
)
to thicken the joined surface. Specify a 1.5 mm as First Offset and 0 mm as
Second Offset. This thickness should be an external thickness. The arrows
displayed on screen when you apply the offset values should be directed
toward the outside of the bottle (see the figure below).
 |
Save the resulting document.
The resulting document is KwrThickSurface.CATPart
When applying a thickness to the joined surface, we could specify a first offset as well as a second offset. But this would make things a bit more complicated as later on we want to measure the internal volume of the bottle. This internal volume is to be calculated from the "Volume" measure of a surface. Adding an internal thickness entails subtracting the volume resulting from this internal thickness to the one calculated for the joined surface.
Now you can select the sketch feature in the specification tree to access the sketcher, drag the D and E points and see how the global shape reacts.