It's hierarchical structure allows you to share resources, so that you do not have to place duplicate copies of the same resource in several directories.
The PRM file is also used for certain other purposes, such as setting flags. These are explained below.
A sample file is provided with this application, and it is best to make a copy of it and edit it. The default location is ...intel_a\startup\EquipmentAnd Systems\ProjectData and the file is named Project.xml.
The application will function even if the user does not enter information particular to his site, but nothing can be saved. Therefore, the first task an administrator needs to do is enter information relevant to his site or project.
-
If there is more than one project at your site you will need to make a project resource management file for each project. You can name the file anything you want to and change its location too (see below). However, you must set the variable in the Environment Editor. You do this by opening the Environment Editor dialog box and entering against the line CATDisciplinePath the directory in which your project resource management files are:
If you have more than one project resource management file then by default the application will start with the file named Project.xml, if there is such a file, or the last file used. If you wish to select another resource management file you must open it by clicking Tools > Project Management. Go to the Select tab and select the file and discipline you need. This dialog box shows each resource available to you, unless the value of Visible (see below) against a resource or application is set to No.
-
The resource management file is organized into several sections to make it easier to manage and utilize resources. The image below shows its hierarchical structure, with an exception, which is explained below. "Other disciplines" refers to other disciplines like Tubing, or AEC V4 to V5 Migration Discipline, that are placed at the same level. They are not shown in this image for reasons of space.
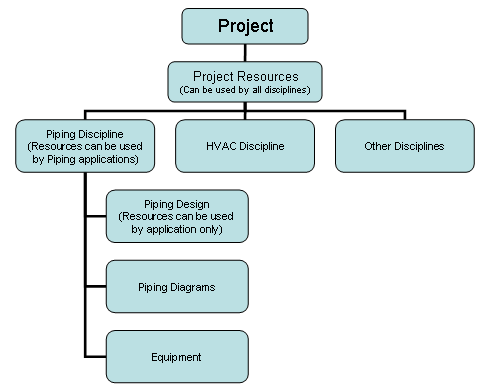
The Project box refers to the project for which the PRM file has been created, and will frequently be identified by the file name. In this case it is Project.xml.
When you look at the Project.xml file you will see that the resource listings begin with project resources. Any resources you place under the heading Project Resources can be used by all applications that are included in the file. In the sample file you will see items like zones, feature dictionary and application-generated object names in this section. All disciplines and applications shown under project resources will be able to access the resources identified under the heading project resources.
The next level is the discipline level. All resources placed under a discipline, such as Piping, can be used by all the applications which are listed under it. In the example above, Piping Diagrams, Piping Design and Equipment applications are shown under the Piping Discipline. Resources such as various catalogs and report definitions are listed at the discipline level and can be accessed by all applications that belong to that discipline.
The next level of resource management is the application itself. Any resource referred to at this level can only be used by that application. Resources like catalogs, files that contain connector attributes and resolved parts directories are listed at this level.
Equipment Arrangement and Hanger Design have been placed under several disciplines. These applications are considered multi-discipline because their resources are used by all disciplines. When you are working in these disciplines you may need Equipment or Hanger resources. However, in different disciplines you may not use the same resources from Equipment Arrangement or Hanger Design and this structuring allows you to place different different resources under each discipline. For instance, under the Piping Discipline, Equipment Arrangement may have a different catalog (with Piping related equipment only) than under the HVAC Discipline.
Equipment and Hanger applications have also been placed at the project resource level, primarily to allow sharing of resources, under the headings "Equipment Application Resources" and "Hanger Design Application Resources."
To explain: If you are working in Piping Design you are in the Piping Discipline. You select the discipline by clicking Tools - Project Management, or simply by opening an application, which will activate the correct discipline. For this to happen your PRM file must be set up correctly.
Now, while in the piping workbench, you want to place equipment in your document, and you launch Equipment Arrangement. When you do so you will only have access to equipment resources that are identified in the PRM file under the piping discipline, for instance the "piping equipment catalog," containing piping related equipment. But let us assume that in your project you have certain types of equipment that are used by all disciplines. You can create a catalog that contains all this common equipment and identify it under "Equipment Application Resources" at the project level (it should not be identified under discipline also). When you do this you will have access to this catalog when you open Equipment Arrangement under any discipline.
Some applications have the entry "Visible = yes". If you set the value to No then this application cannot be used and will not be visible in the Tools - Project Management dialog box.
-
A resource entry looks like this:
<Resource Name="PipingIDSchema" Description="Piping ID Schema Directory">
<ID Type="Path" Driver="File" Location="..\..\EquipmentAndSystems\Piping\DataDictionary"/>
</Resource>
- You should not change the Resource Name, even if you replace a resource with a different one.
- You can change the Description if you want to - this is a brief explanation of the resource.
- The Type field refers to file type. If the Type field says Catia, it refers to a file type unique to Catia, such as .catalog. The type Misc is used for resources which are of a type not unique to Catia and must be opened in another way. The type Path is similar, except that in the Location field only the directory in which the resource is located is named.
- If your resources do not reside in Enovia, enter File in the Driver field. Define the Location field as follows: As shown in the resource example above, the location entry is relative - it is relative to the entry you made in the Environment Editor as shown in Step 1. The entry in the location field will be added to the entry you had in the Environment Editor and it is in that location that the application will look for the resource. Which is why it is preferable to enter absolute paths - including the drive letter - in the location field.
- If your resources are Enovia-based, enter EnoviaV5 in the Driver field. For Enovia-based resources, all you need to enter in the Location field is the file name of the resource without the file extension. For instance, the catalog PipingParts.catalog would be entered as PipingParts.
- The Location field usually gives the location of the resource. If this is a directory path then you can change the location, with an associated change in the PRM file. This entry is sometimes used to enter a value for a flag or behavior, such as 0 or 1, or True and False.
- Some resources have the entry "Visible = yes". If you set the value to No then this resource cannot be used and will not be visible in the Tools - Project Management dialog box.
- Some resources have the entry Access="RW" or "R". These refers to file permissions: read-write or read.
When you change from using file-based resources to Enovia-based resources: You must go through the PRM file and change the "Driver" and "Location" entries as noted above. This must be done for all resources that have been placed in the Enovia database.
-
The Project Resources listed in the sample Project.xml file are described in following sections, beginning with the resources referred to under Project Resources:
- ID schema resources: The "location" lists the directory where the rules for naming objects are stored. Use the default location provided in the sample file. You need to have this for every application you use. In addition, there is an entry for "MultiDisciplineIDSchema." This location is used for objects -such as zones - that are used by all disciplines.
- User dictionary resources: In the location field enter the name of the CATfct file for each application. You do not need to enter the location. The CATfct file is used to store all the classes and attributes created by you. The default names for CATfct files in each application are included in the sample project.xml file and you should use these names unless you have created a different CATfct file, or changed the default name. There is also a MultiDisciplineUserDictionary - this CATfct file can be referred to by all applications.
- Zones catalog: The zones that you create need to be stored in a catalog accessible to all users, because they are shared. The default location is CATMldZone.catalog. Even though zones are only created in schematic applications, other applications may use them when documents are moved from schematic to 3D. Enter a different name or location if you change them.
- Discrete values: Many attributes have discrete values and this directory is used to store them.
- Schematic driven: This is a flag that needs to be set for schematic driven routing and parts placement. If the value of "Location" is set to 0 then individual users can check or uncheck an option that allows schematic driven 3D design. If the value is set to 1 then the option "schematic driven" is always selected and users cannot uncheck it. (In Equipment Arrangement, schematic driven parts placement is not possible if the Function Driven flag is set to 2.)
- Delete Part On Run: This entry is used to control whether all parts on a run will be deleted when you delete the run. If you enter the value of "Location" as 1 then the parts will be deleted. If you enter the value 0 then the parts will not be deleted when you delete the run.
- Graphic representations: When you create graphic representations for a part you need a file in which to store the categories (single, double, etc.). That file is created within an application, as you will see later. There is also a file under Project Resources because the categories must be available to all applications. If you add a new category you must include it in this file too. Enter a new location and file name if you want to change them.
- Penetration openings catalog: The profiles of the holes you may want to make through walls and partitions to pass pipes and ducts are noted in this catalog. If you make a new profile you must enter it here too. Enter a new location and file name if you want to change them.
- ID Sequence Number directory: The IDSequenceNumbers directory contains the last sequence number that was generated for an object. You should specify a location for it.
- Importer CATfcts: This lists the location of your CATfct files, and is used when migrating V4 models to V5. If you change the location of the CATfct files you must enter the new location in the "Location" field. You do not need to do anything if you continue to use the default location.
- Reference Grid System: Location of the CATPart that contains the reference grid definition used by applications. You need to modify this entry if you change the location of the CATPart or rename it.
- Discipline super class: This is a text file that lists the object classes that will be visible in a class browser when you are in the Equipment Arrangement workbench. You can have files at project, discipline and application level. The filter will only work with a user-generated PRM file.
- Computed attributes: This entry shows the location of the ComputedAttributes.txt file. The computed attributes contained in this file will display in the Properties dialog box. You can change the location of this file, and update the PRM file accordingly. You can also change the entries in the file.
- Unique reference part number options & partially resolved reference part number options: These two entries define how a placed part will be named. 'Unique reference' parts are those that have at least one property (or all properties) that can have infinite values. An HVAC duct is an example. 'Partially resolved' parts are those in which the values of all properties are defined by a design table. Valves are an example. In this entry, if you enter 1 in the Location field then the name of the placed part will be derived from the design table. If you enter 2 then the name will be derived from the object naming rules.
- Publication Based Connections: This entry controls whether publication based connections will be used when establishing connections between elements in different work packages. When this flag is on (the value in the Location field is 1), the system will use publication based link technology. This link technology is intended to improve support for configuration management, revision management and concurrent engineering. When working in an ENOVIA environment, publication based connections are used for all cross document connections, regardless of the setting of this resource.
-
The next level, as explained above, is the Discipline level. Resources placed under the Discipline category can be used by all the applications in that discipline.
The sample Project.xml file places the following resources at the Discipline level. Each entry names the file and gives its default location. If you intend to use different resources, which is likely, then you must enter the new file name and location, as appropriate. The following resources are referenced, but not all disciplines will have all of these resources.
- Specifications catalog
- Insulation specifications catalog
- Material specifications catalog
- Standards catalog
- Design rules: You need to use the default location and file name
- Parts catalog name and location: contains parametric parts
- Piping lines shared catalog: The file where shared piping lines are stored and its location.
- Sample data directory: This is the location where the reports you run will be stored.
- Report definitions directory: The formats (definitions) you create for running reports are stored in this directory.
-
In addition to resources placed at the Project and Discipline levels, resources are also placed at the application level and are only available to the application under which they are placed. 2-D applications have all or most of the following resources.
- Component catalog: The parts catalog.
- Shared instrument lines catalog.
- Annotation catalog.
- Sample data directory: When you create graphic representations for a part you need a file in which to store the categories (open, closed, etc.). If you add a new category you must include it in this file too. Enter a new location and file name if you want to change them.
- Design rules for Equipment Arrangement: This is used when assigning a part type to a 2D part.
- The parts catalog for Equipment Arrangement: This is used when assigning a part type to a 2D part.
3-D applications will have most of the following resources or entries.
- Graphic representations file: When you create graphic representations for a part you need a file in which to store the categories (single, double, etc.). If you add a new category you must include it in this file too. Enter a new location and file name if you want to change them.
- Connector attributes file: This file lists the attributes that will be inherited (from the part) by a connector when you are placing it on a part. If you want to make changes to the attributes you want a connector to inherit you must do it in this file. Do not change the name or location of this file.
- Resolved parts: When you place a parametric part in a document it assumes specific dimensions. Once a part has specific dimensions it is placed in the Resolved Parts catalog. The location of the default Resolved Parts catalog is listed here.
- Design rules: You need to use the default location and file name.
- Parts catalog name and location: contains parametric parts
- Report definitions directory: The formats (definitions) you create for running reports are stored in this directory.
- Graphic 2D Symbols Catalog: For Piping, this is the catalog in which the 2-D equivalents of 3-D endstyles are stored. For Equipment, this catalog contains 2-D symbols for center of gravity. See Drawing Production for more information.
- Growth Factor: Some applications allow you to reserve space in some parts for future growth. You can, for instance, reserve space in a conduit for future growth. The space saved for future growth will be equal to the value you enter in the "Location" field. If you enter 0.2 it means that 20 percent of the space in a conduit will be reserved for future growth and you will only be allowed to use 80 percent of the space in it.
- Function Driven: This is a flag that controls parts placement in Equipment Arrangement. The value in the Location field dictates: 1 - Function driven equipment placement is possible; 2 - Only functionless equipment placement is possible. (Schematic driven parts placement is not possible in Equipment Arrangement.); 3 - Both function driven and functionless equipment placement are possible (a final Tools - Options setting is needed. See Functionless Parts Placement in Equipment Arrangement documentation.)
- Hanger Cable Clearance: The value in the Location field is the cable clearance, in millimeters. This value plus the diameter of the cable you are routing must be less than the tier spacing of the hanger. The cable clearance value is assigned when a hanger is placed.
- HVAC Up Direction: The value in the Location field determines the 'Up' direction of a part that is placed on a run. There are two numerals in this field - the first dictates the up direction for a part placed on a horizontal run, the second is for a vertical run. Thus, if the value is 00, the Up direction will the same for both horizontal and vertical runs. The values are: 0 - follow the run's Up Direction; 1 - Up direction will follow the X axis; 2 - follow Y axis; 3 - follow Z axis.
-
The AEC Migration Discipline refers to a product that enables you to migrate V4 models to V5. It has Piping Design, Piping and Instrumentation Diagrams, Equipment Arrangement, Tubing Design and HVAC Design resources under it.
Most resources have been described above and do not need further explanation. Enter the location and file names if they are different from those in the sample Project.xml file.
In addition, under the heading AEC V4 V5 Migration there are several options you should know about. They are explained below.
AEC V4 V5 Migration
There are several options that you need to set to True or False. The first several are about migrating data to Piping and Instrumentation Diagrams, Piping Design, Equipment Arrangement, Tubing Design and HVAC Design and Structures. If a V4 model has data of all these types, but you have set two of them to False, then you will only receive V5 data relating to the applications set to True. If you want data of all types to be migrated then you must set all the options to True.
Other options are:
- Create runs without parts: If set to True a run will be migrated without the parts.
- ImportPipingLine (or other type of line): If set to True a line will be created in the V5 Piping Line catalog if it does not exist. When set to False, the migration process will stop if the line does not exist in V5.
- Mapping Table: You need to enter the location and name of the migration mapping table if you change the default name or location.
- MigratedPIDNoShowSheetFormat: The sheet format (also known as title block) will not be visible if the value of "Location" is set to False.
- MigrateXXXWithMissingLines: If set to True the sheet will be migrated even if some Lines cannot be. If set to False the migration process will stop if missing lines are encountered.
- MigratedXXXSheetSize: Enter the size in the Location field: Letter, Legal, A0, ISO/A1, ISO/A2, ISO/A3, ISO/A4, ISO/A, ANSI/B, ANSI/C, ANSI/D, ANSI/E, ANSI/F, ANSI).
-
In addition to some of the resources explained above, the Structure Discipline includes the following resources or entries:
- Sections catalog: If you change the default location of the AISC_BigScale catalog then enter the location in this entry. The location should include the directory AISC in which the catalog should reside, so that the path reads: ......AISC\AISC_BigScale.catalog.
- Structure sections path: The path of the directory in which the available sections are stored. The default location is ...startup\components\StructuralCatalogs\ModelsResolved.
- Structure Thickness List: This is the location of the thickness list sample file, which contains the list of thicknesses that can be applied to a plate.
- Structure openings catalog: Location of the openings parts catalog.
- Structure materials catalog: Location of the structure materials catalog.
- Structure detail design: Location of the catalog that contains user defined features.
- Naming section characteristics: Location of the NLS file that lists names of sections whose names should not be changed. This is for internal use. Do not change anything in this entry.
- Structure Functional Connections Catalog: Location of the Structure Functional Connections Catalog. This catalog contains the names of connection types between objects.
- Project Bounding Box: This specifies the dimensions of your project - if you are designing a ship then it will be set within these dimensions. You can define the unit used for measuring - the default is millimeter - and change the default values for each direction. The values are measured from the origin (000).
-
Make sure to save your changes.
![]()