Problems Involved When Migrating to a DLName Mechanism Strategy
E:\users\ses\CATProducts\Product1.CATProduct
points to a part contained in the following CATPart document:
E:\users\ses\CATParts\Part1.CATPart
If you open the document Product1.CATProduct and select the
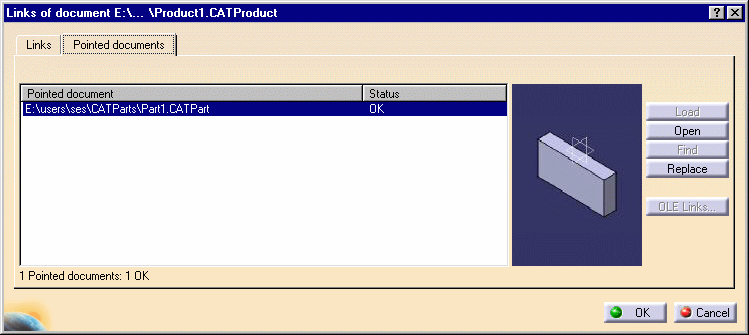
Edit->Links... command, you will see in the "Links" and "Pointed
documents" tabs that the CATProduct document points to the correct CATPart
document. For example, this is what you see in the "Pointed documents" tab:

E:\users\ses\CATParts\Part1.CATPart
is stored physically inside the document:
E:\users\ses\CATProducts\Product1.CATProduct
However, it is not sufficient to simply create DLNames for all the directories where your documents are stored. Because the path of pointed documents is stored in the pointing document, you need some way of converting the pathname in the document to the corresponding DLName.
The CATDLNameMigr batch tool can be used to solve this problem. The batch tool can be used in two modes:
- repair mode: the pointing documents are "repaired", in other words modified to replace the pathname by the correct DLName
- check mode: provides information and generates a text file containing a list of DLNames; the pointing documents are not modified.
Running the CATDLNameMigr Batch Tool
On Windows
install_root\code\bin\CATDLNameMigr.exe
where "install_root" is the name of your installation folder which is, by default:
C:\Program Files\Dassault Systemes\B18\intel_a
     (Windows XP Pro)

     C:\Program Files\Dassault Systemes\B18\win_b64 (64-bit code on
     Windows XP Professional x64 Edition)

     C:\Program Files (x86)\Dassault Systemes\B18\intel_a
     (32-bit code on Windows XP Professional x64 Edition)
On UNIX
     /usr/DassaultSystemes/B18/OS/code/command/catstart
     -run
CATDLNameMigr
CATDLNameMigr Command Syntax
CATDLNameMigr [-r] filename(s) [-p] dir -d directory [-h]
-r filename: activates repair mode and modifies the specified file-p directory:does NOT modify the original file, but copies it to the directory specified and modifies the file in this directory only. This is useful if you do not want to modify the original file.-d directory:name of directory containing pointing documents-h:displays help.
Running CATDLNameMigr in Repair Mode
E:\users\ses\CATProducts\Product1.CATProduct
and the documented pointed to is:
E:\users\ses\CATParts\Part1.CATPart
Make sure that no DLNames have yet been created.
To do so, select the Tools->Options... command, then the
Document tab in the General category. To make the DLName
environment the current document environment, select "DLName" in the
Document Environments column, then select successively the Allowed
and Current buttons.
Then, click the Configure... button and add the two DLNames. You can name them "DLName1" and "DLName2."
Make DLName1 point to:
E:\users\ses\CATParts
C:\Program Files\Dassault Systemes\B18\intel_a\code\bin (Windows XP Pro)

     C:\Program Files\Dassault Systemes\B18\win_b64\code\bin (64-bit code on
     Windows XP Professional x64 Edition)

     C:\Program Files (x86)\Dassault Systemes\B18\intel_a\code\bin (32-bit code
     on Windows XP Professional x64 Edition)
CATDLNameMigr -r
     E:\users\ses\CATProducts\Product1.CATProduct
- you chose to run the tool with the "-r" option, so it will attempt to save the file
- it analyzed the file:
E:\users\ses\CATProducts\Product1.CATProduct
and succeeded in modifying it.
A report is created in the directory containing the pointing document:
E:\users\ses\CATProducts\Product1.CATProduct.CATDLNameMigr_report
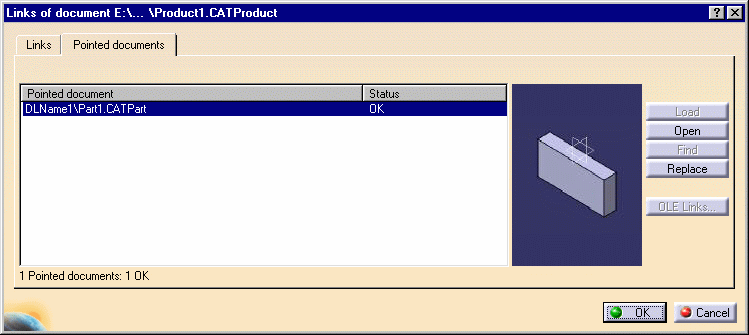
Product1.CATProduct.Edit->Links... command,
then click the "Pointed documents" tab:
DLName1\Part1.CATPart
CATDLNameMigr -r -d E:\users\ses\CATProducts
modifies all the files found in the directory E:\users\ses\CATProducts.
The "-d" option can be run in check mode without the "-r" option.
Furthermore, if you do not want to modify the original document, specify the "-p" option followed by the name of a directory. For example, the command:
CATDLNameMigr -r E:\users\ses\CATProducts\Product1.CATProduct
-p E:\users
runs the tool in repair mode, does NOT modify the original file, but
copies it to the directory E:\users and modifies the file in
this directory only. This is useful if you do not want to modify the
original file.
Running CATDLNameMigr in Check Mode
For the purposes of this scenario, we are going to use the same documents. But this time, make sure that NO DLNames have yet been created.
C:\Program Files\Dassault Systemes\B18\intel_a\code\bin
     (Windows XP Pro)

     C:\Program Files\Dassault Systemes\B18\win_b64\code\bin
     (64-bit code on Windows XP Professional x64 Edition)

     C:\Program Files (x86)\Dassault Systemes\B18\intel_a\code\bin
     (32-bit code on Windows XP Professional x64 Edition)
CATDLNameMigr
E:\users\ses\CATProducts\Product1.CATProduct
Note that this time, you do not use the "-r" option.
Because you have not yet created a DLName for the path:
E:\users\ses\CATParts
the batch tool cannot replace the path by the appropriate DLName. Displaying the document using the Edit->Links... command will show that the path has not been modified.
The output displayed in the command prompt window informs you that:
- you have chosen to run the tool in check mode (because you did not specify the "-r" option")
- it could not change the link in
E:\users\ses\CATProducts\Product1.CATProduct - the following file has been created in:
C:\Documents and Settings\user\Local Settings\Temp\CATDLNameMigr_missing-DLNames_report.txt
in which a DLName has been created. The file contains the following line:
DLName1;E:\users\ses\CATParts;/tmp;
The ".txt" file can now be imported, which will allow you to run the tool again later to repair the document.
A report is created in the directory containing the pointing document:
E:\users\ses\CATProducts\Product1.CATProduct.CATDLNameMigr_report
informing you that the link could not be changed because there was no corresponding DLName.
To do so, select the Tools->Options... command, then the
Document tab in the General category. To make the DLName
environment the current document environment, select "DLName" in the
Document Environments column, then select the Allowed button.
Click the Configure... button, then the Import...
button, browse to select the file:
C:\Documents and Settings\user\Local Settings\Temp\CATDLNameMigr_missing-DLNames_report.txt
The following DLName is added:
DLName1 E:\users\ses\CATParts
Command Outputs
Running the command in any of the above modes outputs information to the command prompt window about the tasks processed. This information can also be obtained using the "-h" option.
![]()