 |
This task
explains how to set up and lock DLNames in administrator mode.
This allows you to implement a tightly controlled data storage strategy
whereby end users will be able to store data in only those directories
referenced by DLNames. |
| |
A Reminder
about DLNames
|
| |
The Document tab, accessed via the Tools ->
Options... command, lets end users choose the way in which they
access their documents. They set up "document environments" which can be:
- Folder: using this environment, end users explore the file
tree to read and save their documents anywhere they like and without
restriction
- DLName: using this environment, end users can determine that
their documents will be read from or saved in specific directories only;
they then assign a logical name, referred to as a "DLName", to each
directory. In this mode, the different file opening and saving commands
only allow end users to access documents in directories referenced by
DLNames. Furthermore, the list of DLNames created can be exported to a
text file for further use, for example the list can be imported by
another end user to save time setting up directories.
The advantage for end users is that it provides rapid and convenient
access to document directories, which avoids having to explore the whole
filetree.
This is very convenient in organizations where there is only a small
number of end users. But from the point of view of the administrator of a
large site, allowing users to store their documents anywhere can lead to
anarchy.
For a full description of how DLNames are created from an end user point
of view during an interactive session, refer to the description of how
document environments are set in the section "Customizing Settings -
General - Document" in your Infrastructure Users Guide. |
| |
Phase One: How To Set Up DLNames for Your End Users
|
 |
1. Log on as an administrator. You
must belong to the Administrators group, or have the privileges assigned to
the Administrators group.
For the purposes of this particular scenario only, you need to log on as
administrator because you are going to modify the default global
environment (V5R18). |
| |
2. Select the
     Start->Programs->CATIA ->Tools->Environment
     Editor V5R18
command to display the Environment Editor.You will
see an environment with the following name:
CATIA.V5R18.B18
|
| |
3. Double-click the CATIA.V5R18.B18
environment to display the corresponding environment variables. |
| |
4. Locate the following
environment variable: CATReferenceSettingPathNote that the
default setting for this variable is empty. |
| |
5. Reset the variable so
that it points to an existing folder, for example:
     CATReferenceSettingPath
     E:\users\administrator\LockSettings
then save your modification, and exit the environment editor. This
folder will contain the setting locks you will create later. The folder
access rights must be set up for read access only for end users, and
read/write for the person creating the setting locks. |
| |
6. Run a session using the
following command:
cnext -env CATIA.V5R18.B18 -admin
or:
cnext
     -admin
A session is started using the default global environment, and a message
informs you that you are running in administration mode. |
| |
7. Click OK in the message
box, then select the Tools->Options... command. The "Options"
dialog box is displayed. |
| |
8. In the General
category, click the Document tab. Note that a lock symbol like
this  appears opposite each option: appears opposite each option:
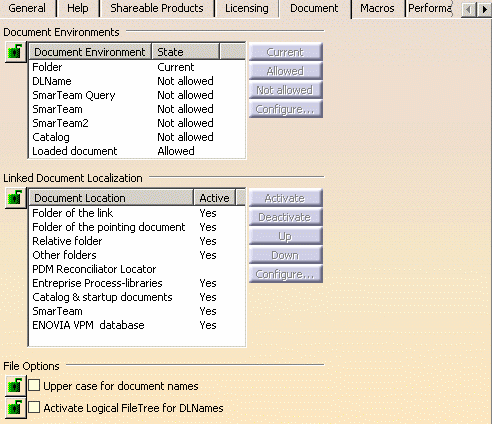
|
| |
Setting the
DLName Environment As Current
|
| |
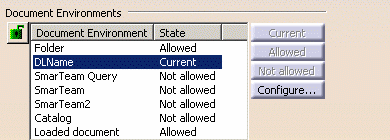
9. To make the DLName
environment the current document environment, select "DLName" in the
Document Environments column, then select successively the Allowed
and Current buttons.
DLName is now defined as your current document environment as indicated
by the "Current" value in the State column:
|
| |
Creating
DLNames
|
| |
Now that you have set the DLName environment as your
current environment, you have to create the DLNames you will use. |
| |
10. Click the Configure... button to
open the Configure dialog box which lets you add or remove DLNames:
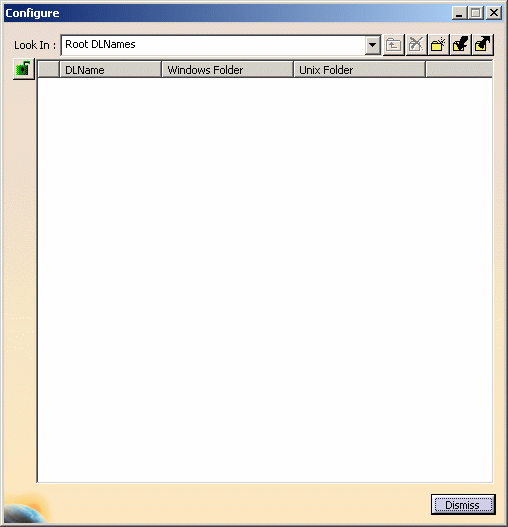 |
|
11.
Click the  button or right-click
then select the New command once for each new DLName you want to
create. button or right-click
then select the New command once for each new DLName you want to
create.A default name and a default folder are assigned to each new
DLName as shown below:

|
|
12. To customize the DLName, click "DLName1", then
click again to activate the editor field, type the new name and press the
ENTER key.
For example, change the name to "CATParts":
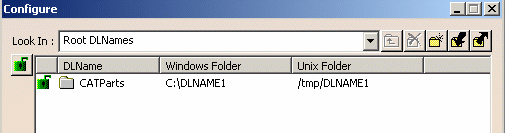
|
| |
When creating DLNames, you can also organize them into a
logical tree using Root DLNames. For more details, refer to the section
"Customizing Settings - General - Document" in your Infrastructure Users
Guide.
|
|
13. To customize the folders, click C: (Windows) or
/tmp (UNIX) in the appropriate column, then click again to activate the
editor field, type the path of the folder and press the ENTER key.
Instead of typing in the editor field, you can also choose a folder by
clicking in the field, and selecting the New contextual command and
selecting the folder using the explorer which is displayed. |
 |
Note that you can include system or user-defined variables
in DLNames using the syntax $ {VARIABLE}: Example 1
C:\users\${MODEL}\publish
where ${MODEL} is a user-defined variable.
Example 2
DLNAME2=${HOME}
where ${HOME} is equivalent to
c:\ on Windows. |
| |
14. To lock the DLName for end users, select the
DLName and click the Lock icon. Locking a DLName changes its state from
"Green" to "Orange" (and inversely when you unlock the DLName):

|
| |
The reason why you would want to lock DLNames is to
restrict end user access to only those folders referenced by DLNames. End
users running Version 5 using the same environment will inherit the locks
you set on DLNames, and will not be able to either modify or remove them. |
| |
15. Add another DLName and name it "CATProducts",
lock it using the same procedure as above, then rename the folders:
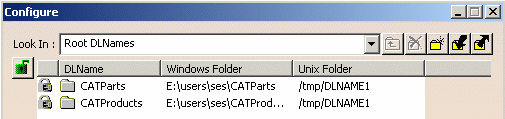
|
 |
End users will not be able to modify or remove DLNames,
but will still be allowed to add DLNames. If you do not want this to
happen, lock the list by clicking the green lock symbol
to change it to the orange lock
symbol  . End users will then see the
red lock symbol . End users will then see the
red lock symbol  and will not be able
to add DLNames to the list. and will not be able
to add DLNames to the list. |
| |
16. When finished adding DLNames to your list, you
can then click the Export... button
 to save your list of DLNames
as an ASCII .txt file. to save your list of DLNames
as an ASCII .txt file.This is particularly useful when you have a large
number of machines. You can then import the .txt file containing the
DLNames onto all the machines so that end users also inherit the same
DLNames, as described in Importing
DLName Settings in Batch Mode.
You can make as many lists as you like. Whenever you want to use one of
them, just click the Import... button
 before selecting a list from
the Import dialog box. before selecting a list from
the Import dialog box. |
| |
17. Click OK to close the Configure
dialog box |
|
18. To force end users to use the DLName strategy
only, make sure that "DLName" is still "Current", set Folder to "Not
Allowed", click the lock for the Document Environments, then click OK
to exit the Document tab. |
 |
DLNames settings are stored in the settings file:
DLNames.CATSettings. |
|
 |
| |
Phase Two: What Your End Users See
|
|
|
This task describes the effect of setting up and locking
DLNames on the end user environment. |
|
|
1. Log on as an end user, and start a Version 5
session using the normal startup commands, that is, without using the "-
admin" option. |
| |
2. Click the Open icon
 or select the File->Open... command.
Because your
administrator earlier locked the access to document environment selection,
and forced the DLName document environment, instead of the usual File
Selection dialog box, the following panel opens:

|
| |
The "Look in" pulldown list only contains the DLNames you
defined in the previous steps:
|
| |
3. Select the desired File name and type from the
list. |
| |
4. Click OK to open the document. |
| |
DLNames are also integrated in the following commands:
- File->Save (included Save As, Save All and Save Management)
- File->Desk
- File->New from...
- File->Send To
- Edit->Links
- Catalogs
- Search order ("Other folders" option), etc.
|
| |
5. Select the Tools->Options...
command, then the Document tab in the General category. |
| |
6. Select the DLName option in the
Document Environment list, then click the Configure... button to display
the Configure dialog box:
|
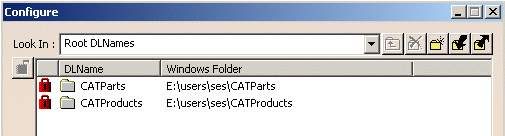
| |
Note that you cannot delete, modify or rename
any of the DLNames in the list. |
|
|