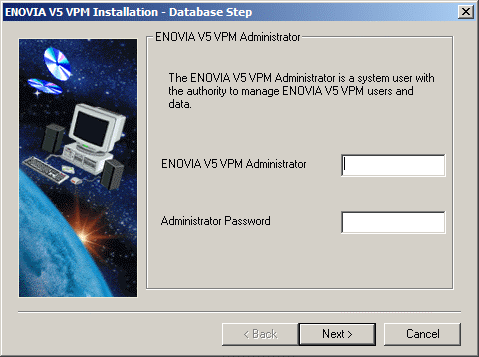
Once the ENOVIA V5 VPM files have been installed, the ENOVIA Administrator dialog box appears.
- Enter the user name and password of the
ENOVIA V5 VPM Administrator.
Note: The ENOVIA V5 VPM Administrator's User Name and Password must already exist. Both of these entries are case sensitive.
Note that, at this point, the userid and password may not be recognized on the computer. This means that either you have made a mistake, or you entered a UNIX userid and password because the database to which you want to connect is located on a UNIX workstation.
The following dialog box then appears:
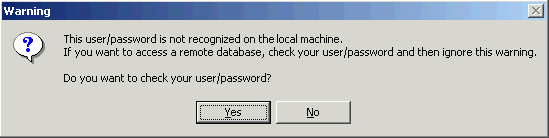
If you click Yes, the userid and password will be checked. If you want to access a remote database, the warning will be ignored.
The ENOVIA V5 VPM Administrator:
- has administrative privileges in ENOVIA V5 VPM
- creates users
- grants privileges for users
- grants roles to users
- grants process access to users
- must already exist as a system user.
- Click the Next button to move to the next step.
The Installation Execution dialog box appears, which lets you specify exactly what operation to perform during the installation:
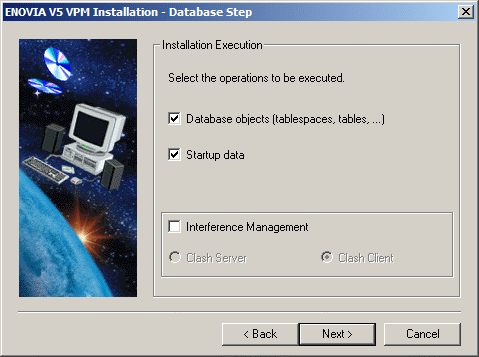
What Are Database Objects?
Database objects are the data structures implemented to support the ENOVIA V5 database.
Checking this option:
- creates tablespaces (or uses existing tablespaces)
- creates data structures ( application tables, indexes and views) using the DDL files installed with the code; the role of these data structures is to manage data persistency and object mapping
- sets up privileges for accessing the data structures
- in all database domains, sets up (inserts) CDM STEP data required for domain management (mapping of domain objects)
- creates the dictionary owner and ENOVIA Administrator in the database.
What Are Startup Data?
Once the data structures have been created, the installation inserts startup data into certain database application domains.
Checking this option:
-
sets up domain administration
-
sets up a default people and organization (P&O) implementation comprising a root organization (ADMIN), a default role used for logging onto ENOVIA V5 VPM (VPMADMIN), and an administrator
-
creates default security management: privileges (functional access control), masks (data entity & attribute access control) and processes
-
imports lifecycle graphs.
What Is Interference Management?
The Clash Server is used to compute geometric interference analysis from ENOVIA V5 product assembly data.
A clash server is installed on the machine if the Interference Management option is checked. If the option is not checked, a clash client is installed.
In a typical industrial scenario, most installations will have a separate UNIX workstation acting as clash server. The ENOVIA V5 VPM server will be configured as a clash client to the clash server.
The ENOVIA V5 VPM server does not need a graphics card installed to run. The Clash Server, on the other hand, MUST have a graphics card installed as well as the V5 code.
Regenerating ENOVIA V5 Environment Files and Settings
In order to regenerate ENOVIA V5 Environment files and settings used for runtime purposes, you should select neither Database Objects, nor Startup data.
Whenever you choose to install the Startup data, you will not have the option to generate a file containing DDL commands.
If you choose to install the Startup data but not to install the Database Objects, it is assumed that you have already installed the Database Objects.
- Select the installation operations that you wish to execute.
If you are installing ENOVIA V5 VPM for the first time, check all the options.
- Click the Next button to move to the next step.
The DBMS Type dialog box appears:

- Check the option for the database you have installed:
- IBM DB2 Universal Database
- Oracle.
- Click the Next button to move to the next step.
At this point, the dialog varies, depending on the database you are using.
![]()