-
Select the profile you created.
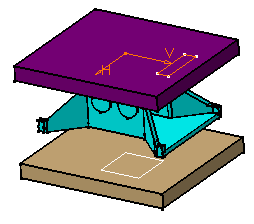
You can use profiles sketched in the Sketcher workbench, sub-elements of sketches or planar geometrical elements created in the Generative Shape Design workbench.
The Assembly Features Definition dialog box appears.
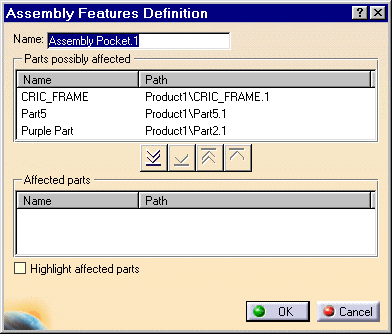
The dialog box that appears displays the names as well as the paths of the parts that may be affected by the extrusion.
The assembly feature's name appears in the Name field. If desired, you can edit this name.
The frame Affected parts is exclusively reserved for the parts you wish to use. Purple Part is displayed in this frame.
Note that the Pocket Definition dialog box is displayed.
-
The frame Affected parts is exclusively reserved for the parts you wish to use. As you wish to create a pocket between Part5 and Purple Part, move them to the list Affected parts. To do so, click the
 button.
Alternatively, double-click each part.
button.
Alternatively, double-click each part.
The other three buttons lets you move the names of the parts from one list to another too:
-
moves all
selected parts to the list Affected parts.
-
 moves all
selected parts to the list Parts possibly affected.
moves all
selected parts to the list Parts possibly affected. -
 moves the
selected part to the list Parts possibly affected.
moves the
selected part to the list Parts possibly affected.
-
Check the option Highlight affected parts to clearly identify the parts.
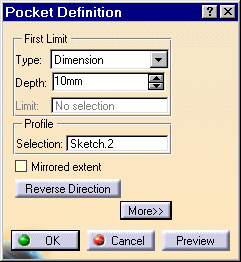
You can define a specific depth for your pocket (using the Dimension and Depth entry fields) or set one of these options to define the pocket type:
-
Up to last
-
Up to plane
-
Up to surface
If you wish to use the Up to plane or Up to surface option, you can then define an offset between the limit plane (or surface) and the bottom of the pocket.
The other options available are:
-
Mirrored extent: mirrors the extrusion using the specifications defined for Limit1.
-
Reverse Direction: inverts the extrusion direction.
Additional options appear if you click the More button.
-
You can define Limit2 as the second limit by using the same options as for Limit1 (Dimension, Up to last, up to plane, up to surface).
-
You can choose between a direction normal to the sketch or define a new direction by selecting geometry.
-
For the purposes of our scenario, enter 110mm as the depth value and click OK to confirm. For more information about pockets, please refer to Part Design User's Guide.
The pocket is created on both parts.
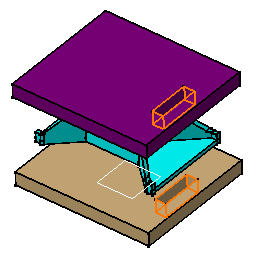
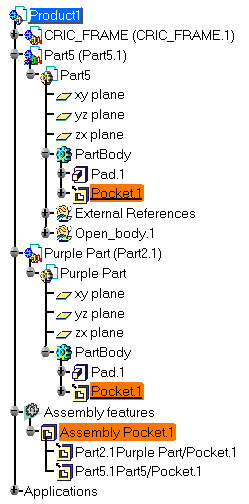
A new entity 'Assembly features' appears in the specification tree. It contains the assembly pocket referred to as 'Assembly Pocket.1" and the affected parts.
Moreover, this feature has generated a pocket in
each part. An arrow symbol identifies these pockets
![]() in the tree,
meaning that a link exists between Assembly Pocket.1and them.
in the tree,
meaning that a link exists between Assembly Pocket.1and them.
Editing an Assembly Pocket
- modify the list of affected parts.
- edit the pocket.
Reusing Part Design Pockets
- You cannot reuse a pocket with the Up to next option, because this option is not applicable for assembly pocket.
- You cannot re-affect an assembly pocket on the part which contains the part pocket, except if the size of the assembly pocket exceed the size of the part pocket, or if the assembly pocket location is different. In fact, you cannot dig vacuum.
-
Click the Pocket icon:

-
Select the Part Design pocket of interest.
-
Both the Pocket Definition and the Assembly Features Definition dialog boxes display. You then just need to specify the parts to extrude.
The assembly pocket inherits the specifications as displayed in the Part Design Pocket Definition dialog box. You can edit these specifications at any time. Editing an Assembly feature created in this way does not affect the specifications used for the Part Design feature.