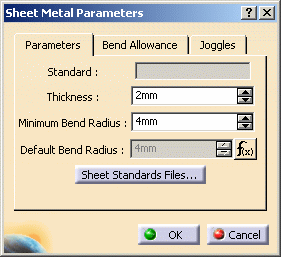
This section explains how to change the different sheet metal parameters needed to create your first feature.
-
Click Sheet Metal Parameters
 .
.The Sheet Metal Parameters dialog box is displayed. 
-
Change the Thickness if needed.
-
Change the Minimum Bend Radius if needed.
The Minimum Bend radius defines the minimum internal radius allowing the creation of a bend. -
Change the Default Bend Radius if needed. To do this, you need to deactivate the formula first by right clicking the formula icon.
-
Click OK to validate the Sheet Metal Parameters.
| Sheet Metal Parameters | Column associated in the Design Table | Definition |
| Standard in Sheet Metal Parameters | SheetMetalStandard | sheet reference name |
| Thickness | Thickness | sheet thickness |
| Default Bend Radius | DefaultBendRadius | default bend radius |
| K Factor | KFactor | neutral fiber position |
| Radius Table | RadiusTable | path to the file with all available radii |
| Standard Names For Holes | Column associated in the Design Table | Definition |
| Clearance Hole | ClearanceHoleStd | path to the Clearance Hole Standard file |
| Index Hole | IndexHoleStd | path to the Index Hole Standard file |
| Manufacturing Hole | ManufacturingHoleStd | path to the Manufacturing Hole Standard file |
| Fastener Hole | FastenerHoleStd | path to the Fastener Hole Standard file |
| Standard Names For Stamps | Column associated in the Design Table | Definition |
| Flanged Hole | ExtrudedHoleStd | path to the Flanged Hole Standard file |
| Bead | BeadStd | path to the Bead Standard file |
| Circular Stamp | CircularStampStd | path to the Circular Stamp Standard file |
| Surface Stamp | SurfaceStampStd | path to the Surface Stamp Standard file |
| Flanged CutOut | FlangedCutoutStd | path to the Flanged CutOut Standard file |
| Curve Stamp | CurveStampStd | path to the Curve Stamp Standard file |
| Stiffening Rib |
| Standard Names For Joggle Compensation | Column associated in the Design Table | Definition |
| Method 1 | JoggleCompensationMethod1 | path to the Method 1 Standard file |
| Method 2 | JoggleCompensationMethod2 | path to the Method 2 Standard file |
| Method 2 | JoggleCompensationOnFlange | path to the Method 2 Standard file |
Example for a hole standard file
| SheetMetalStandard | Thickness (mm) | DefaultBendRadius (mm) | KFactor | [...] |
| AG 3412 |
2 |
4 |
0.36 |
[...] |
| ST 5123 |
3 |
5 |
0.27 |
[...] |
| [...] | ClearanceHoleStd | FastenerHoleStd | IndexHoleStd | ManufacturingHoleStd |
| [...] |
HoleForAero.xls |
HoleForAero.xls |
HoleForAero.xls |
HoleForAero.xls |
| [...] |
HoleForAero.xls |
HoleForAero.xls |
HoleForAero.xls |
HoleForAero.xls |
Whenever a hole is created, a design table will associate its radius with a standard name.
| StandardName | Diameter (in) |
| M1 | 0.39 |
| M2 | 0.65 |
| M3 | 0.89 |
| M4 | 0.25 |
| M5 | 0.56 |
Example for a stamp standard file:
| SheetMetalStandard | SurfaceStampStd | CurveStampStd | CircularStampStd | BeadStd | [...] |
| AG 3412 | SurfaceStampAG3412.xls | CurstampAG3412.xls | CircularStampAG3412.xls | BeadAG3412.xls | [...] |
| ST 5123 | SurfaceStamp5123.xls | CurveStampST5123.xls | CircularStampST5123.xls | BeadST5123.xls | [...] |
| [...] | FlangedCutoutStd | ExtrudedHoleStd | StiffeningRibStd |
| [...] | FlangedCutoutAG3412.xls | ExtrudedHoleAG3412.xls | StiffeningRibAG3412.xls |
| [...] | FlangedCutoutST5123.xls | ExtrudedHoleST5123.xls | Stiffening RibST5123.xls |
| StandardName | Height (mm) | Angle (deg) | Radius1 (mm) | Radius2 (mm) |
|
S1 |
6 |
80 |
2 |
2 |
|
S2 |
8 |
75 |
1 |
1 |
| StandardName | Height (mm) | Length (mm) | Angle (deg) | Radius2 (mm) | Radius1 (mm) |
|
C1 |
4 |
6 |
75 |
1 |
1 |
|
C2 |
5 |
7 |
80 |
1 |
1 |
| StandardName | Diameter (mm) | Height (mm) | Angle (deg) | Radius1 (mm) | Radius2 (mm) |
| C1 |
10 |
6 |
80 |
2 |
2 |
| C2 |
20 |
5 |
85 |
1 |
1 |
| StandardName | SectionRadius (mm) | EndRadius (mm) | Height (mm) |
Radius1 (mm) |
| Bead04 |
4 |
6 |
4 |
2 |
| Bead09 |
9 |
10 |
5 |
3 |
| StandardName | Height (mm) | Angle (deg) | Radius1 (mm) |
|
F1 |
6 |
80 |
2 |
|
F2 |
8 |
75 |
1 |
| StandardName | Minor Diameter (mm) | Height (mm) | Diameter (mm) | DefinitionType | HeightType |
|
2DiamNoRadInner |
15 |
6 |
20 |
TwoDiameters | Inner |
|
MajDiamRadOuter |
10 |
7 |
25 |
MajorDiameter | Outer |
|
MinDiamRadOuter |
10 |
7 |
25 |
MinorDiameter | Outer |
|
P&DNoRadInner |
15 |
6 |
15 |
PunchAndDieDiameters | Inner |
| [...] | ConeOption | RadiusActivity | FlatPatternMode | FlatDiameter (mm) | Angle (deg) | KFactor | Radius1 (mm) |
|
[...] |
TRUE |
FALSE |
FlatDiameter |
5 |
|
2 | |
|
[...] |
TRUE |
TRUE |
FlatDiameter |
5 |
80 |
2 | |
|
[...] |
FALSE |
TRUE |
KFactor |
5 |
90 |
0.3 | 3 |
|
[...] |
TRUE |
FALSE |
KFactor |
5 |
|
0.3 | 2 |
| StandardName | Angle (deg) | Radius2 (mm) | Length (mm) | Radius1 (mm) |
|
S1 |
80 |
2 |
30 |
2 |
|
S2 |
75 |
1 |
35 |
2 |
![]()